Browsing Tag

DIY

DIY Projects

Easy Spring Craft

Hello everyone! It has been a LONG time since I’ve been here, partially due to my own lack of inspiration, but also due to some website hosting transferring issues which prevented me from updating the site at all. I am back and full of inspiration and ready to share with you some fun little things I’ve been working on!

Spring is here, and I am in spring mode! When it comes to most seasonal décor, I tend to shy away from overtly seasonal things. I’m not into bunnies for Easter, or turkeys for Thanksgiving. I prefer a simple and understated look for each season. That being said, I wanted to share a super simple craft for spring time I have! It’s one of those things that makes me feel almost silly for sharing because duh, it’s that easy.

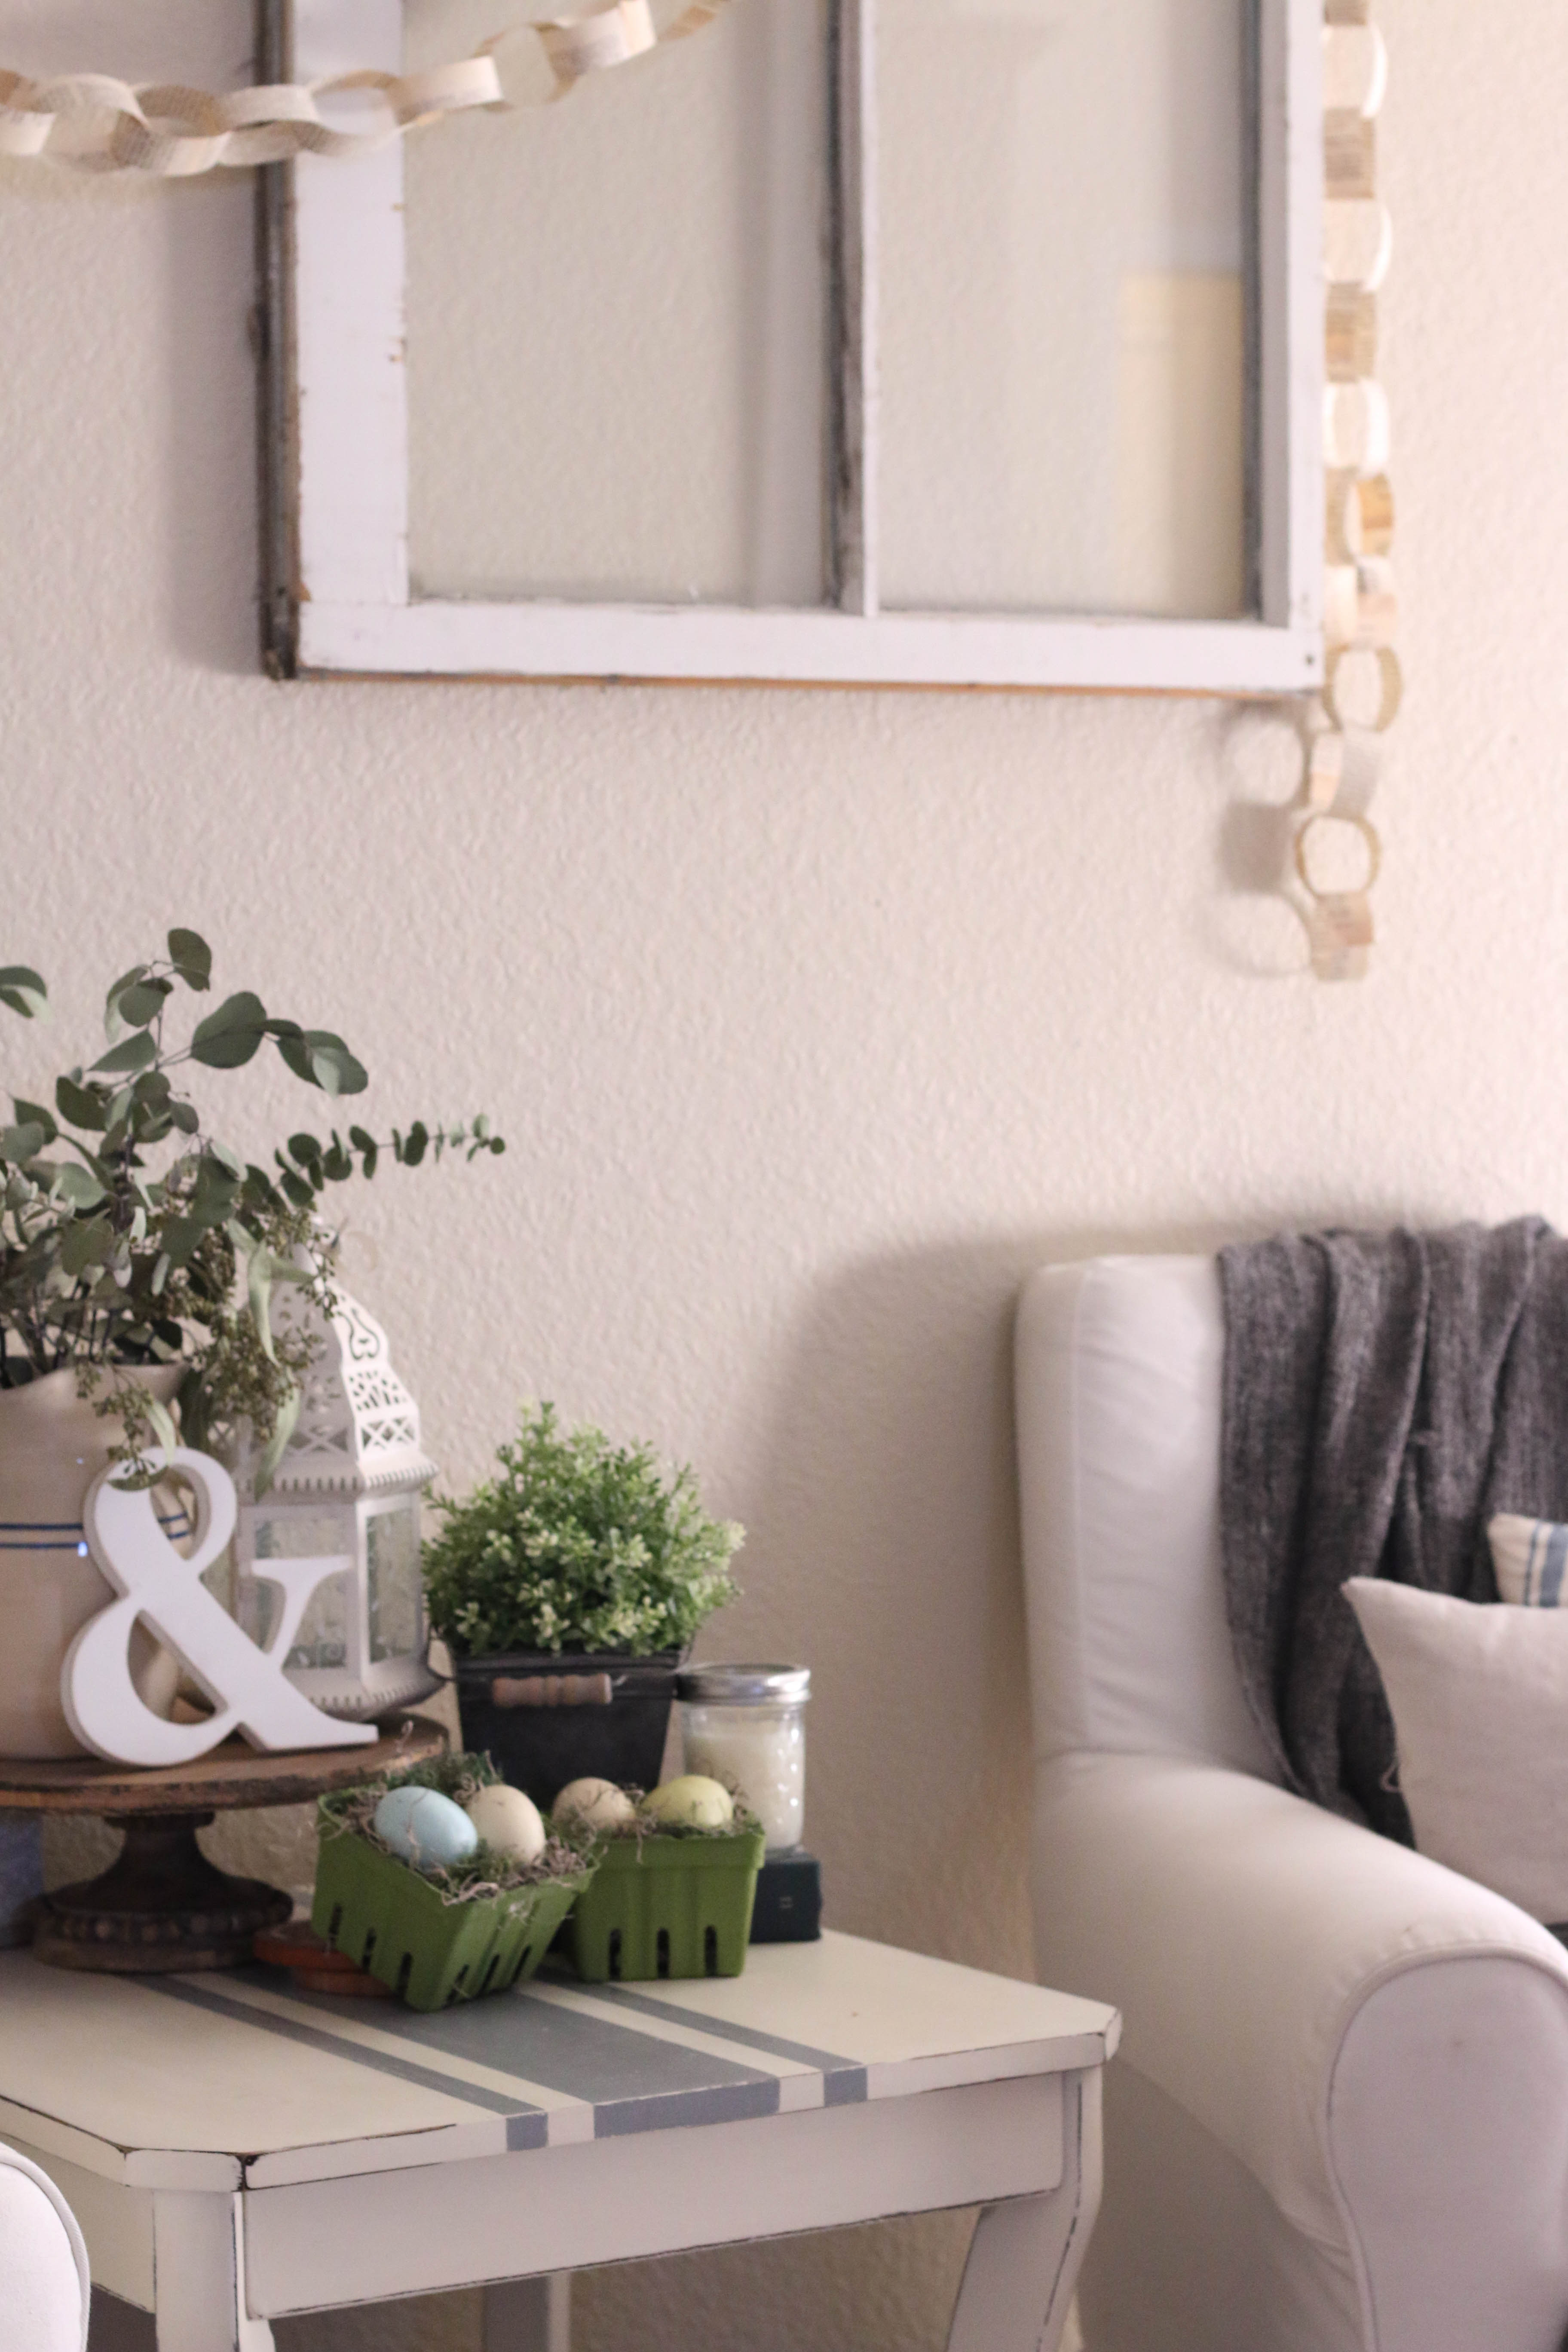
I wanted to make something small enough to be used in a tablescape, but didn’t necessarily have to be used in a place setting. Here’s what I came up with:

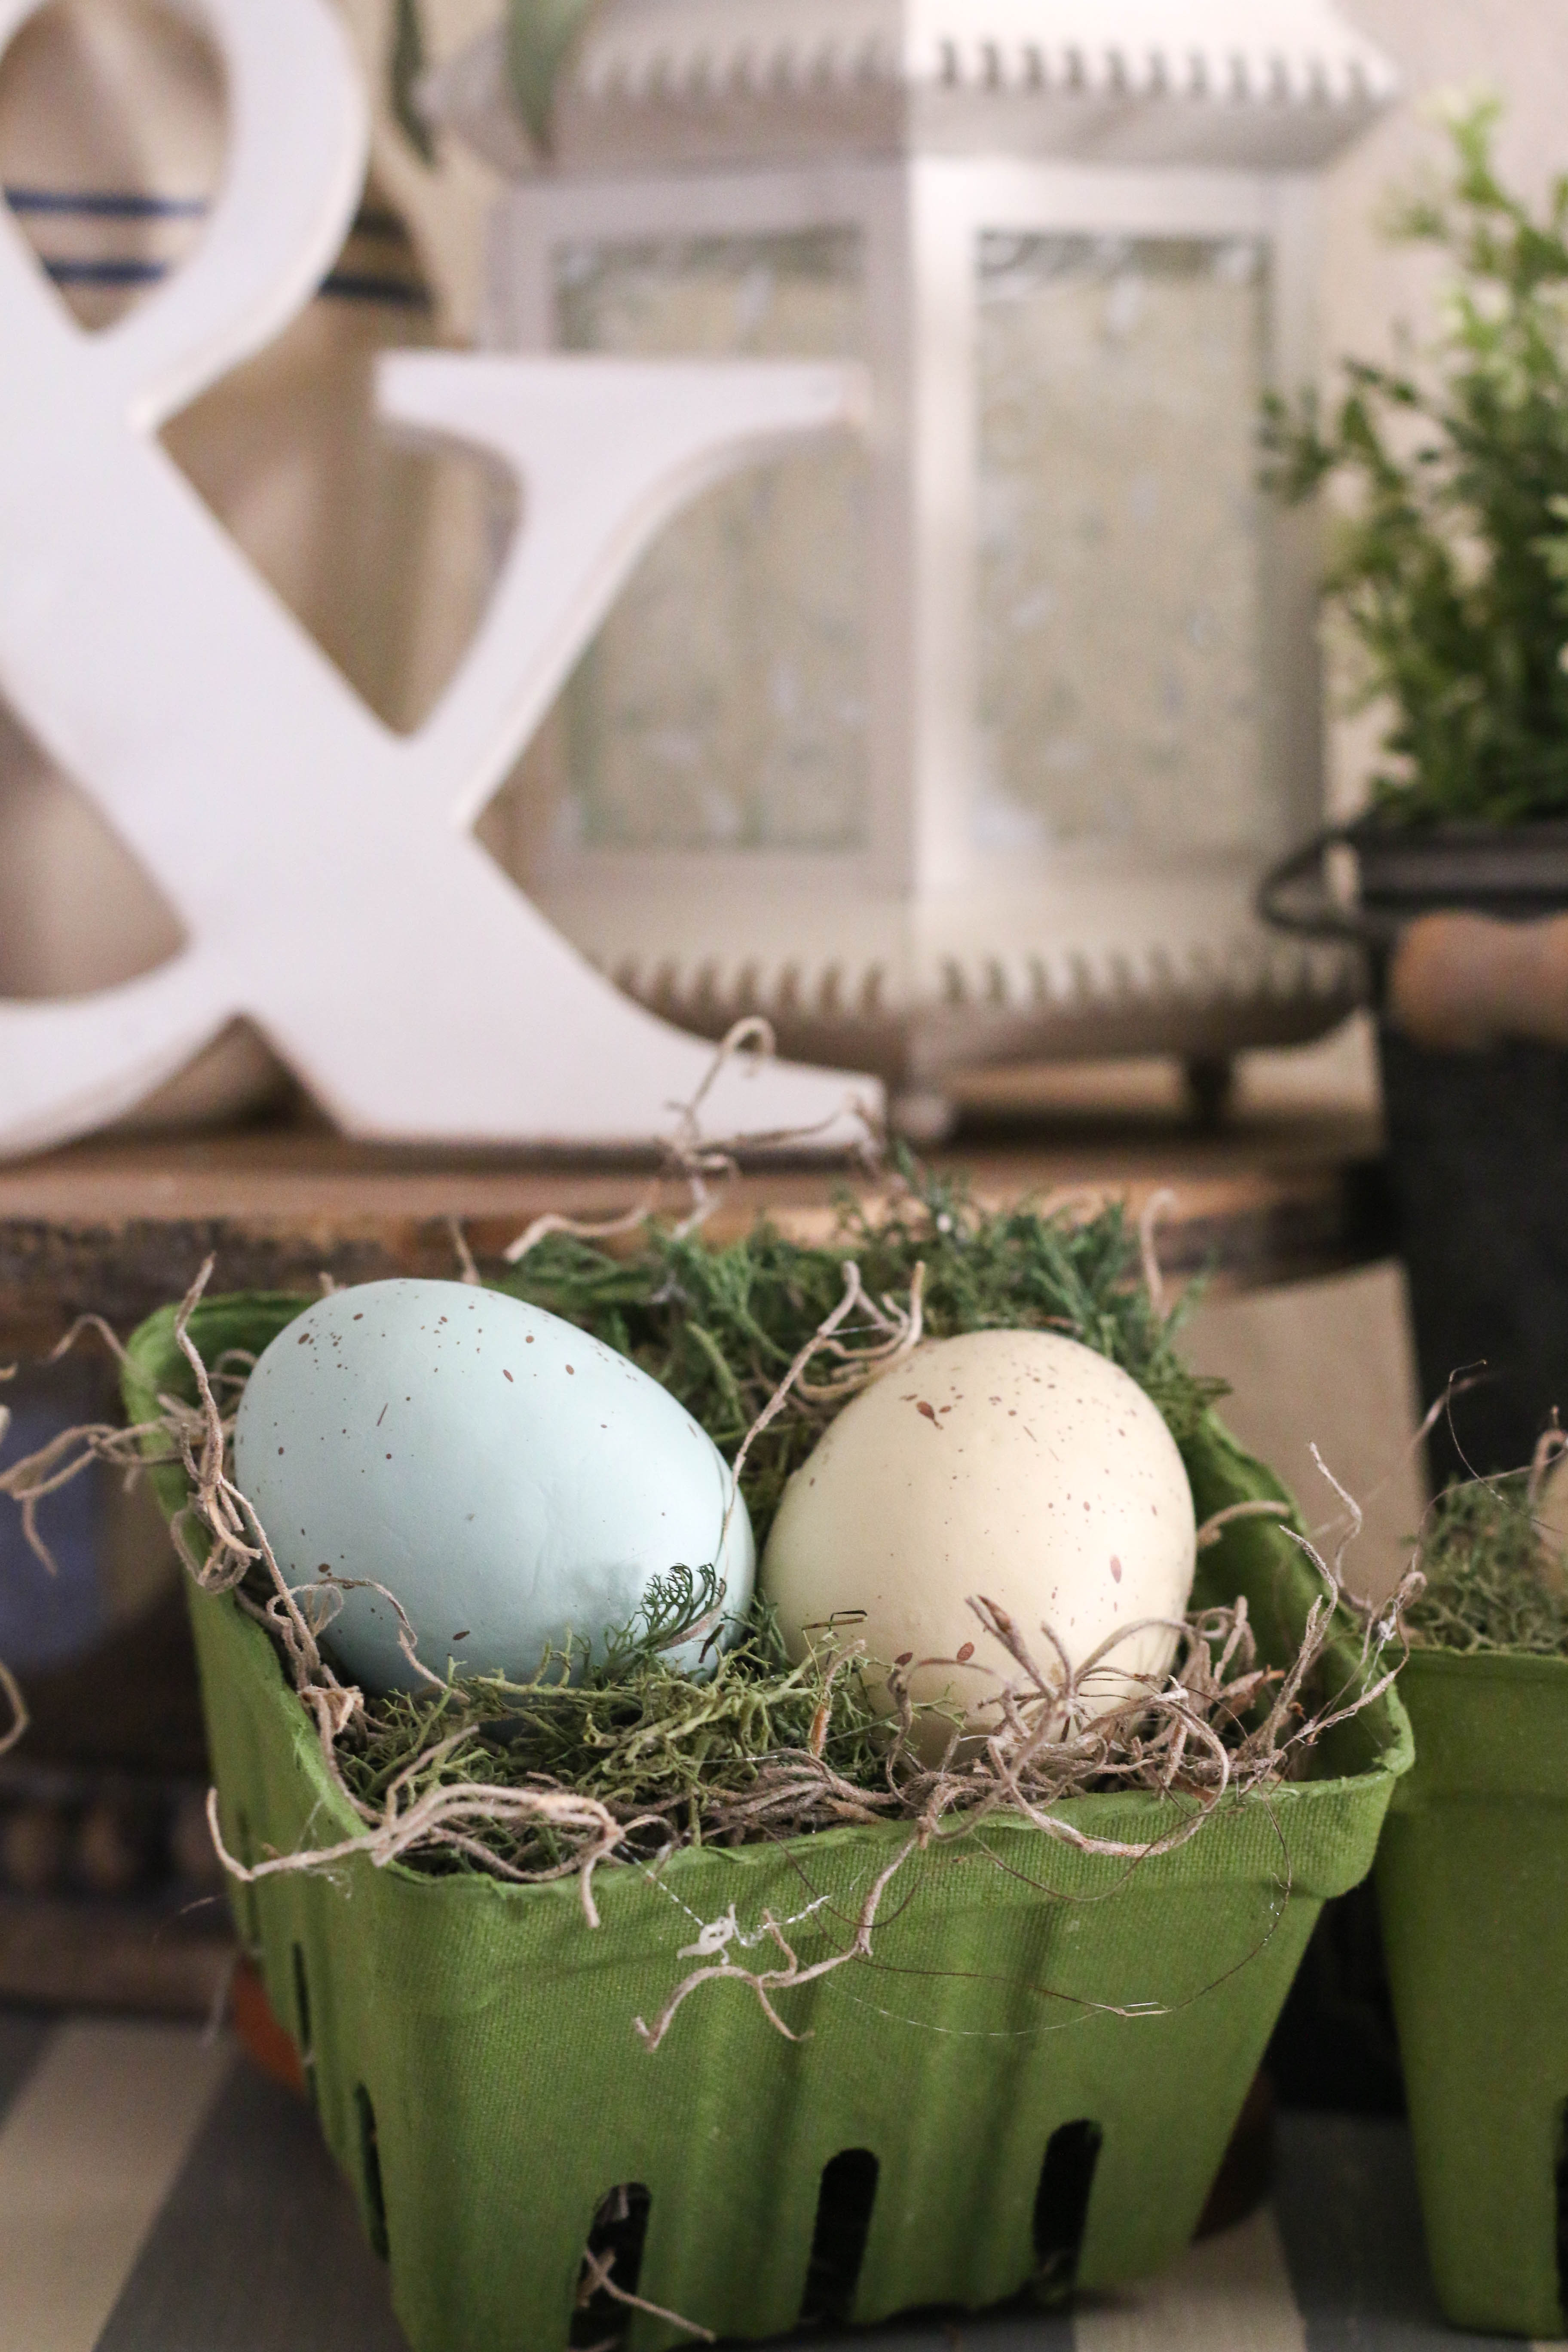
Most of the materials can be found at a local craft store. I hot glued the Spanish moss into the bottom of the berry basket, and added a tiny bit of green moss on top. I hot glued that down as well, trying (unsuccessfully) not to burn my fingertips. I then placed the eggs on top of the moss and glued them down. Again, I’m kind of embarrassed to share these because it’s so simple. But this is the only official spring thing I’ve made for the house, so I had to share!

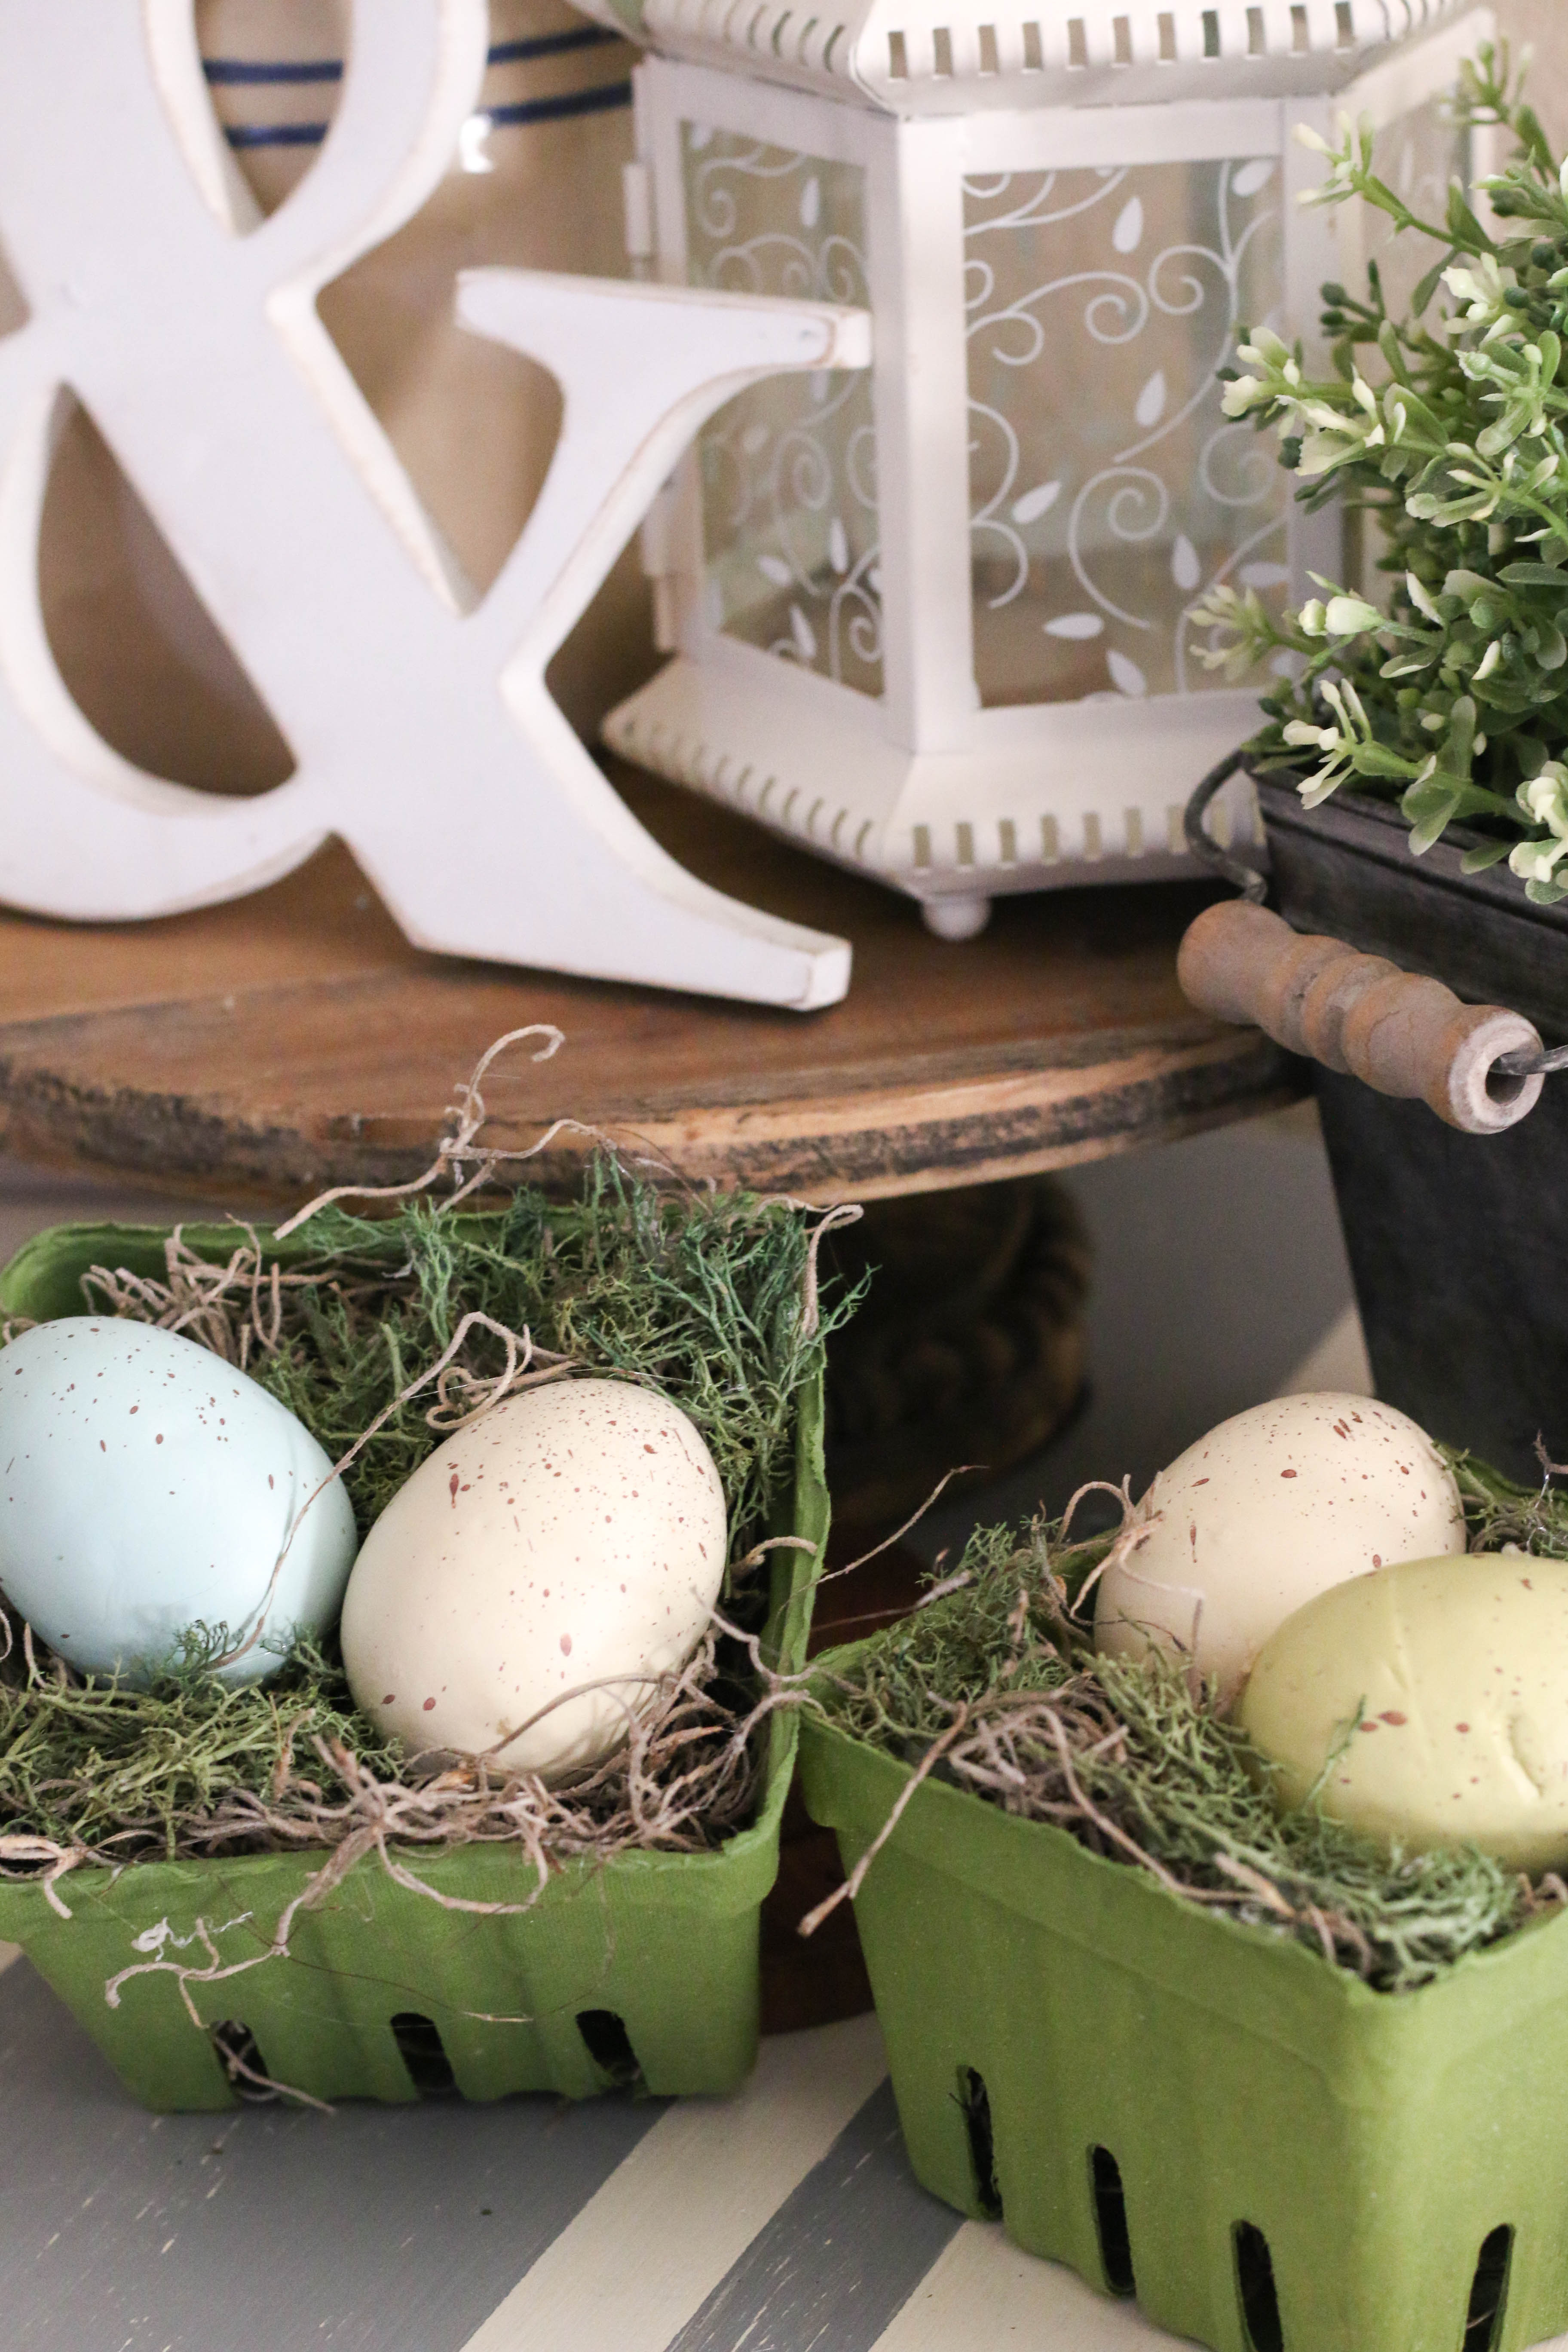
The cool thing about this is that it is totally just a template and you could do whatever you’d like! You could customize this with items you have around the house, or any other small item that suits your fancy. Easy enough, right?

And if you’re not keen on making these yourself, I will have lots of these little cuties available at my booth during Vintage Market Days in Glen Rose, TX. It’s going to be an awesome event that you are not going to want to miss! I have been working really hard to bring some items for this event and I would love to see you there.

Have you gotten your spring craft on yet? I think this season is the perfect one to get crafty! Push away those winter blues with some fun projects! I’d love to see what projects you’re working on! Feel free to tag me on Instagram or Facebook. Happy crafting! That’s all I have for today, have a fabulous day friends!

DIY Projects, Furniture Makeover

DIY Antique Farmhouse Dresser

Hello friends! Happy Monday! Today is good day for a good day, am I right? I’ve been super busy lately with projects and it is a wonderful feeling! Last weekend Ethan and I cleared out our garage, which gave me plenty of room to work. We organized all my materials, and made a place for everything.

It used to be super full and I barely had room to work on anything, but now that it’s all clean, I’ve been super inspired to work on projects in there. It feels like I can finally breathe!

One of the projects that I finished up this week was this little antique dresser. I snagged this dresser up from a friend who was selling it at her garage sale. I saw it and knew I had to have it! And because I am the worst at taking before pictures, you’ll just have to use your imagination. It was just plain brown and missing a few handles.

Well, I painted her up, and here she is in all her antique farmhouse style glory:

Okay, so with this project, I tried something new. I knew I wanted it to be super distressed, and rather than use my sander, I wanted to try the Vaseline trick that furniture painters everywhere have been talking about. So I applied Vaseline all on the edges of the dresser. (Basically where you see distressing is where I applied.) I found that it was easiest just to use my finger rather than messing with a paint brush.

After I applied my Vaseline, it was time for paint. I used Palais White by Behr in a flat finish. I painted everything evenly, including the areas that where I had used Vaseline. Now here’s where it gets tricky. My dresser needed two coats. Being the impatient person that I am, I could not wait to see the effects of the Vaseline after the first coat of paint. So, I began rubbing the areas with a rag. This was a dumb idea because I still had to paint a second coat.

The paint will not adhere to the Vaseline, and it basically makes a crackly looking paste in the areas where the Vaseline was applied. If you have to paint two coats, do not remove the Vaseline until finished with both coats. That was my biggest mistake. The technique worked well enough, but I had to reapply Vaseline so I could do my second coat.

Personally, I think I would rather just take my sander to the project afterward, but it’s good to try new things. Plus that’s mostly because of my own impatience.

After I finished the painting, I topped it with Annie Sloan clear wax to give it a protective finish. The wax is technically used for chalk paint, and I previously had only ever used it on chalk paint, but because flat paint is pretty porous, I figured I’d give it a try, and it worked pretty well!

I just love this cute little dresser, and it matches my light and bright farmhouse style perfectly! But alas, I won’t be keeping this one. She will be heading with me to my spring shows (which I will be keeping you posted about more soon, but the first one will be the Vintage Market Days in Glen Rose Texas in March. So that’s good news for you, because this cutie could be yours!

So, have you ever tried using Vaseline to distress painted furniture? I’d love to hear about your experience! Don’t forget you can find me on Instagram and Facebook for more behind the scenes fun of my day to day life! Well friends, that’s all for today. Have a fabulous day!

Home Decor

Clean and Wintry Tablescape

How is it January already?! This is crazy! I am heading into two years of blogging, and that is crazy to me as well! Every year when Christmas is over, and all my decor comes down, I crave simplicity. And, let’s be honest, I am pretty much ready for spring. I know that we will have winter weather yet, but so far the temperatures have been around sixty each day, which just feels wonderfully spring-like.

Anyway, I took down all my Christmas decor and I made my table simple and clean for the wintry months ahead. I know it might seem silly, but I really do always have my table made up. It brings me joy to have a pretty looking table, and no one should be able to steal your joy, so I say do what you want! I like to use a lot of blues in our house, and so I have one set of blue napkins that are my absolute favorite. I tend to mix these in with each season.

winter-table-1

I’ve been meaning to buy some napkin rings for a while now, but my cheap self never could pull the trigger. I found these the day after Christmas at Hobby Lobby. They were a metallic gold, which was a little too “holiday glitzy” for me, so I painted over them with a quick gray paint. The paint naturally wore off in a few areas (probably because of the slick texture), and it turned out to be perfectly chippy. I love it!

winter-table-4

The white pillar candle was also an after Christmas clearance special (my favorite time to shop). A simple jar with cinnamon and my DIY Boxwood Topiary  make my little cakestand look finished yet clean.

 winter-table-6

And can we talk about this afternoon sunlight pouring in? For some reason late afternoon sun perfectly equates to winter for me. I’m not sure why, but this season really can be beautiful (even if it gets dark incredibly early and we don’t even have snow).

winter-table-5

For me, setting the table really can be a theraputic and meaningful time. I love the finished product of course, but the act of designing and putting together a table is incredibly rewarding to me. What about you? Do you have a table that’s typically set, or do you prefer a blank canvas?

A few sources for this design if you’re interested:

Napkins: Tuesday Morning

Napkin Rings: Hobby Lobby

Cake Stand: Magnolia

Plates: Target

Chargers: IKEA

That’s all for today, friends. Have a fabulous day!