Browsing Tag

bedroom

Organization

Tips on Loving Your Closet

Do you have the perfect vision of what your dream closet is? I know I do. Cue soft playing music and a warm bright spot. My dream closet is ultra feminine, with a full window for natural light, and a vanity for doing makeup. My dream closet is obviously larger than my childhood bedroom. There’s room in there for a soft armchair where I can drink my tea, a freestanding full length mirror for trying on clothing, and perhaps a vintage mannequin. My wedding dress is displayed, and the whole thing is light and airy. Have I even mentioned the perfectly organized rows of clothing and shoes? My collection is expansive, yet impeccably organized just like a magazine. Can you tell I’ve thought about this? Just a little bit.

Raise your hand if you have something pictured in your head similar to what I just described. Yes, I’m talking to you. I know most of us have unrealistic dreams like this and that’s okay!

Cue reality though (we’ll use my closet for an example): my closet is a 2×3  foot box with one awkwardly placed pole (not even tall enough to hang a knee length dress from) and two measly shelves on the top (one of which I can barely reach). Like the rest of our house, it’s the color of a camel’s behind, and a carpet that hasn’t been touched since the 1960’s. Living the rental dream. 

Here’s the deal. It would be so easy for me to be discouraged by the size of my closet, or frustrated that I don’t have things as nice as others. Today I want to share with you some tips I’ve found on how to love the closet you have (that don’t include getting a new closet).

This year, my mission has been to organize everything and purge the excess. The closet was the first place to start! I started off the new year by reading The Life Changing Magic of Tidying Up. I am not kidding when I say thing book will change your life! It’s a pretty short book, but I had read the whole thing in a day. I finished feeling energized and ready to tackle my house! There are specific sections of the book designated specifically for clothing, and so I took some of the tips listed there and reorganized my closet. I can now tell you that when I walk over to my little closet, I feel refreshed and calm! And I don’t even have an armchair where I can drink my tea. Can you imagine?

closet2

Step One: 

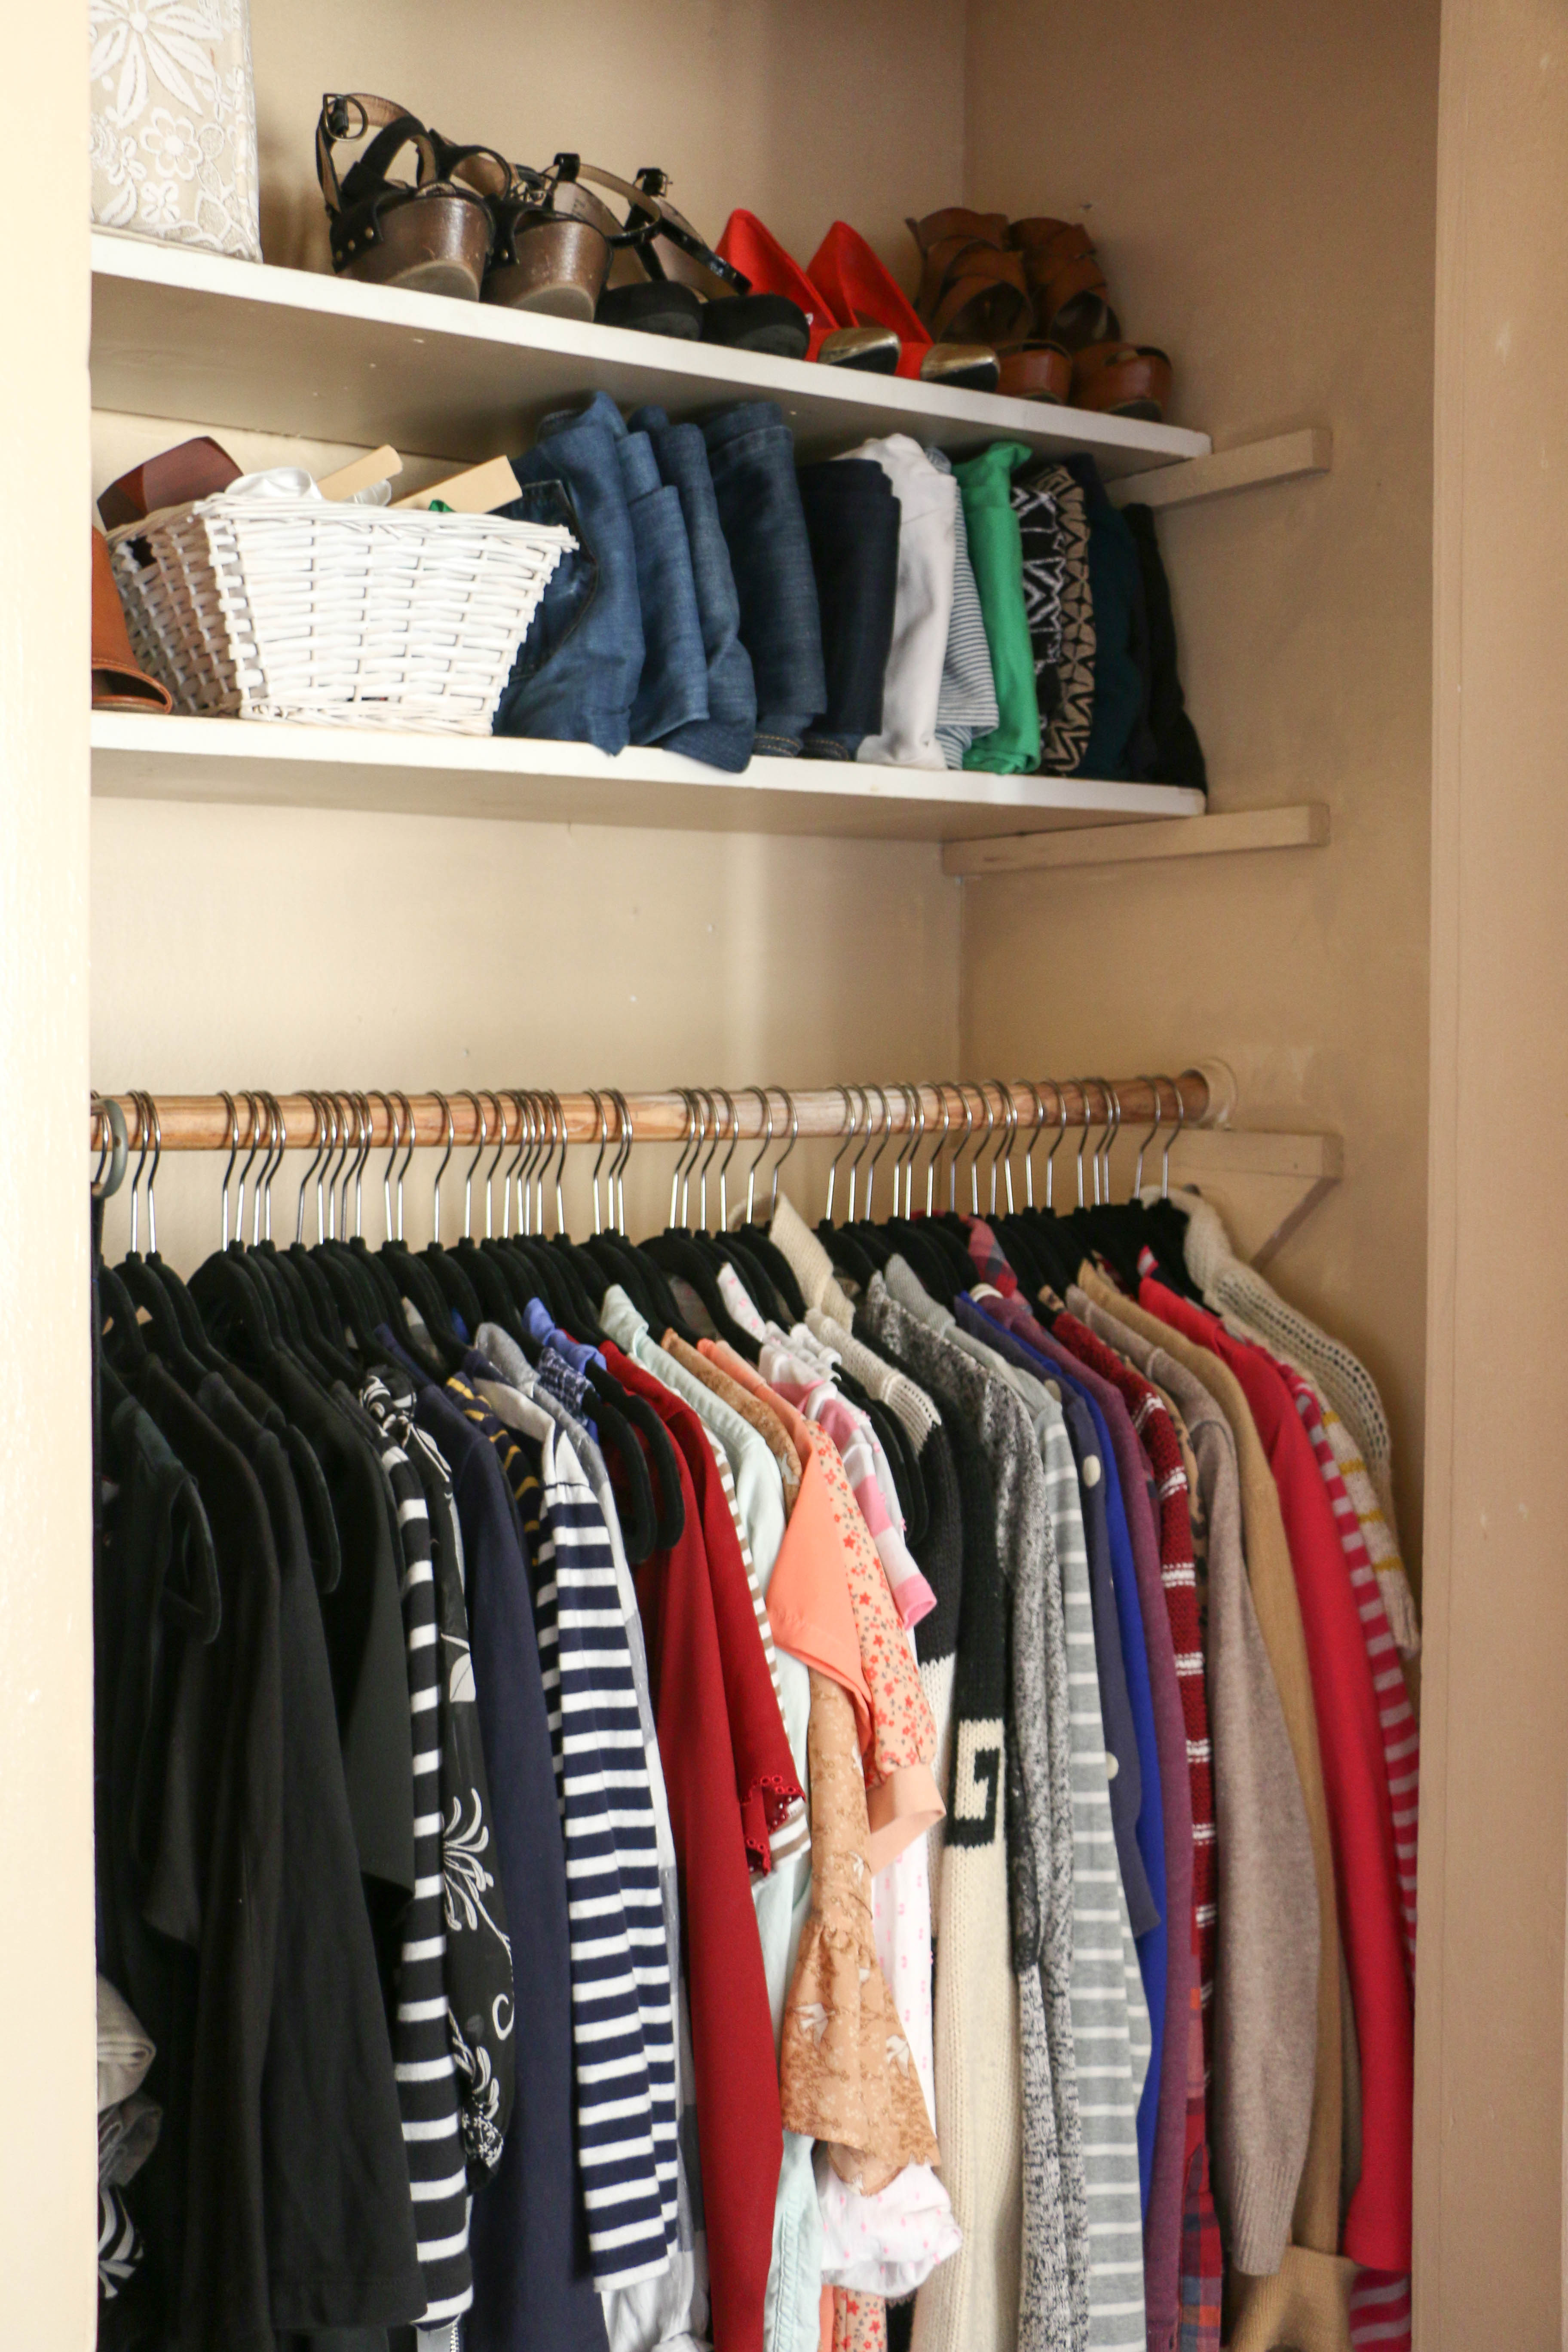
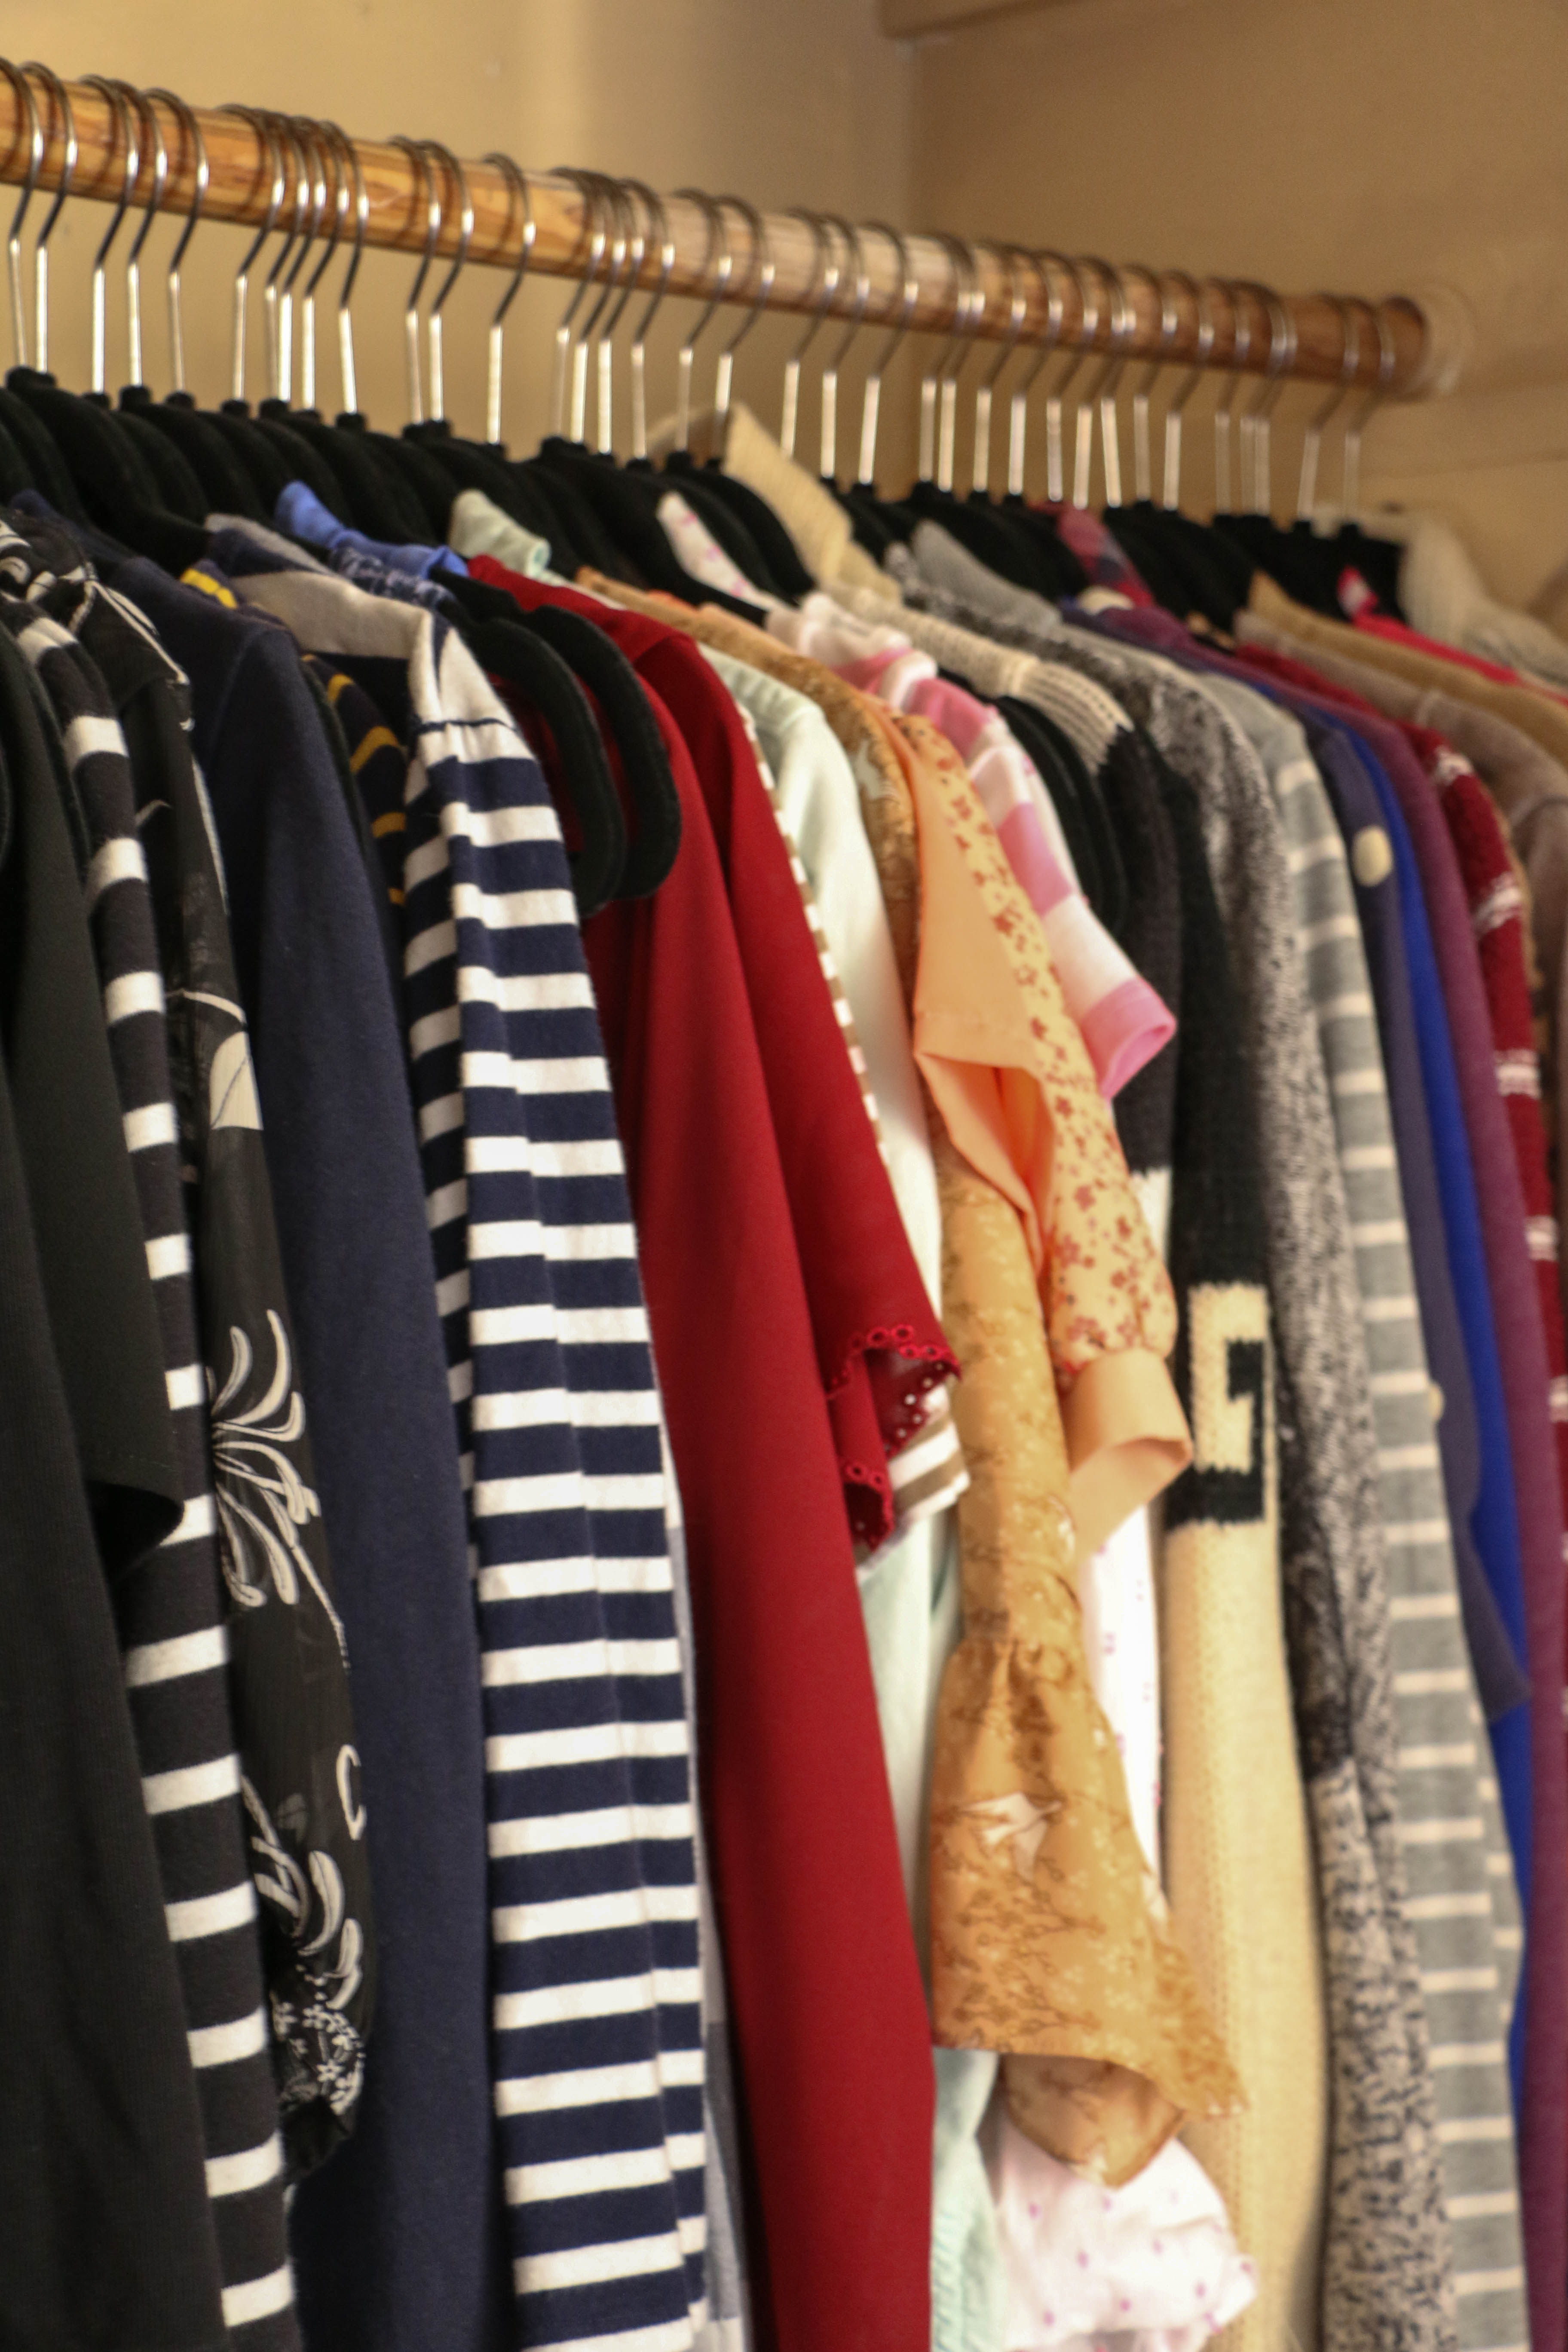
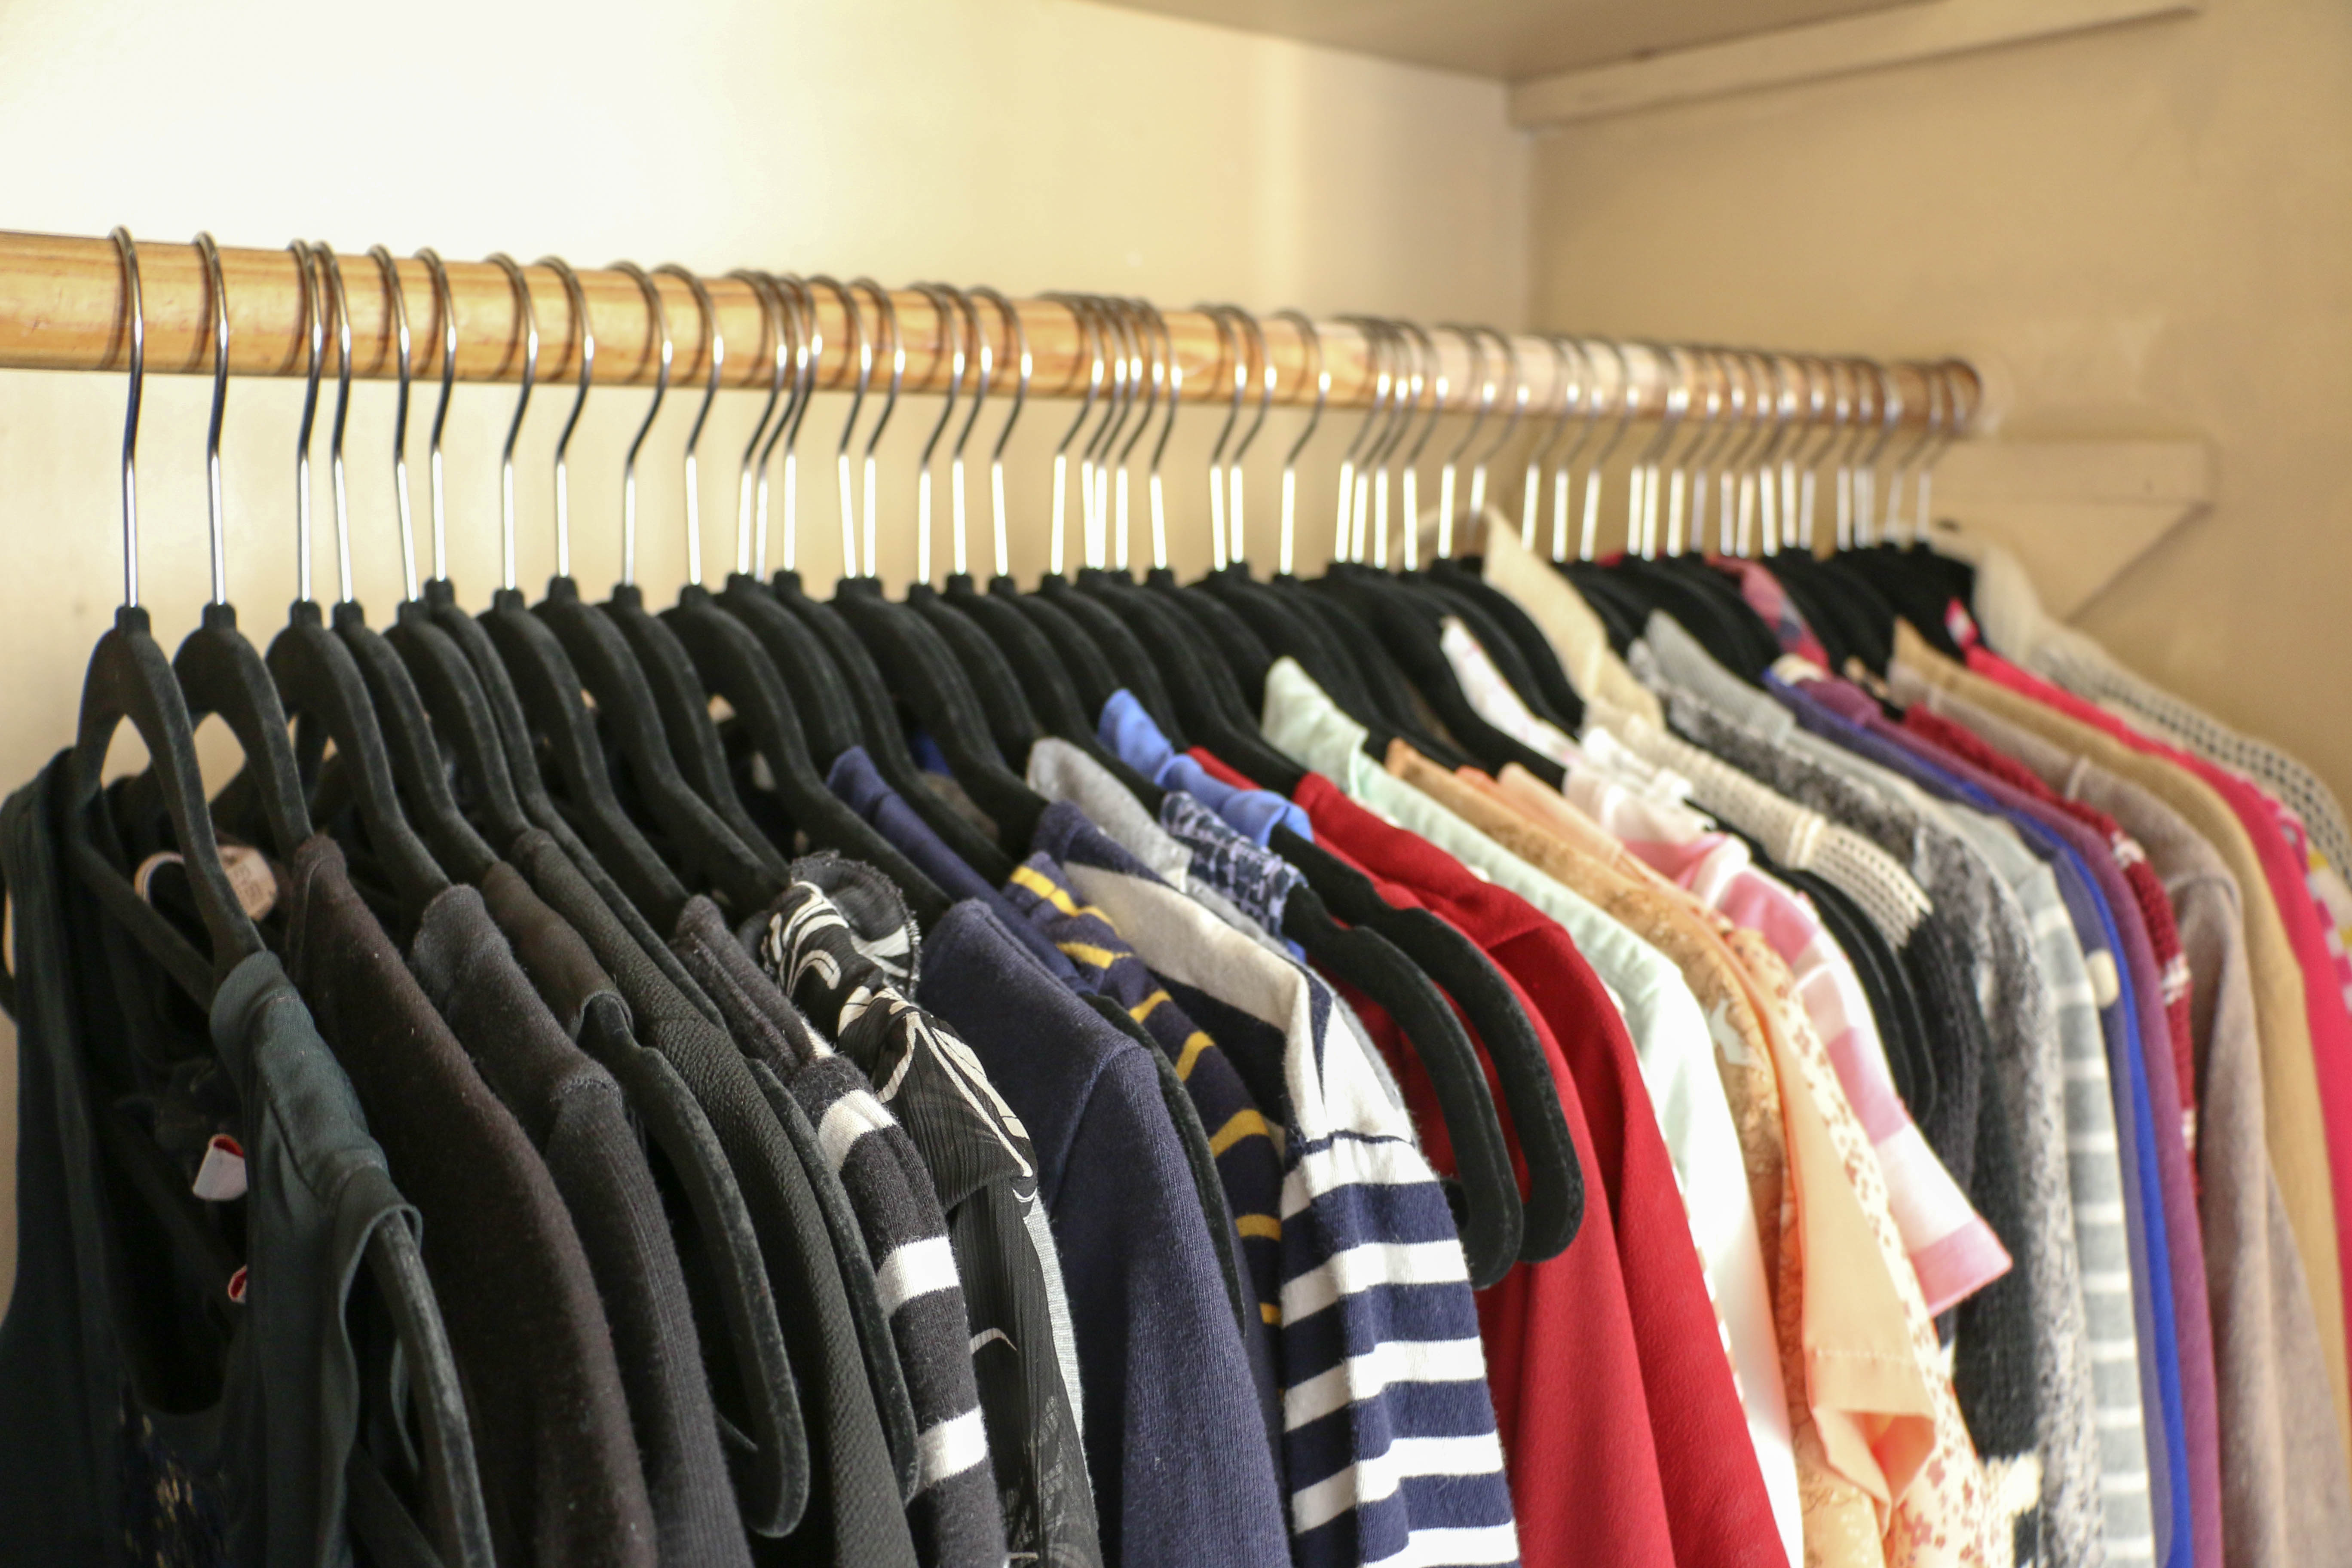
Get rid of everything. I’m not joking. I took every. single. piece. of clothing out of my closet and laid them on my bed. From there I looked at each item one by one and asked myself when the last time I had worn the item was. I had to be harsh with my answers about what to keep and what to get rid of. The things I love but wear infrequently because I’m too lazy to iron – those things went to the donate pile. The things I’ve been meaning to mend but secretly know I won’t get around to – donate. The things that are near duplicates of other items – donate. Because of the awkward height of the bar in this closet, my dresses are hung in Ethan’s closet. So all I have here are my tops (both blouses and sweaters). I wanted to keep only the things I have in my closet are the things I will actually wear on any given day.

closet3

Step Two:

Organize by color. One of the things that makes my teeny-tiny-barely-even-there closet bearable now is that the order of things is aesthetically pleasing. I kept my shirts and sweaters separate, each category moving from the darkest on the left to the lightest on the right. There is a whole psychology behind this method that I don’t really understand, but I will say that it does make things look intentionally placed. Each piece has a perfect spot, and the color scheming actually helps me plan my outfits with ease. All my black tops are in the same place, and I know exactly where the hanger is when I’m putting something away.

closet4

Step Three:

It’s all about the hangers. This step is definitely not necessary, but I would recommend it. Until this point, I still had the multi-colored plastic hangers I acquired in bulk in college. They were cheap, and I was broke. I’ve wanted to buy coordinating black velvet hangers for a long time, but could never justify the expense. The only reason I bought these is because I had extra Christmas money. Ethan was not really thrilled with the thought of me spending my Christmas money on hangers, but I assured him it’s what I really wanted. He’s the one who married this organizational freak, so he can’t really complain too much. Anyway, I bought two of these packs, and used Bed Bath and Beyond’s 20% off coupon. I will eventually need to get another pack or two to finish Ethan’s closet and the coat closet, but my wallet says it’ll have to wait.
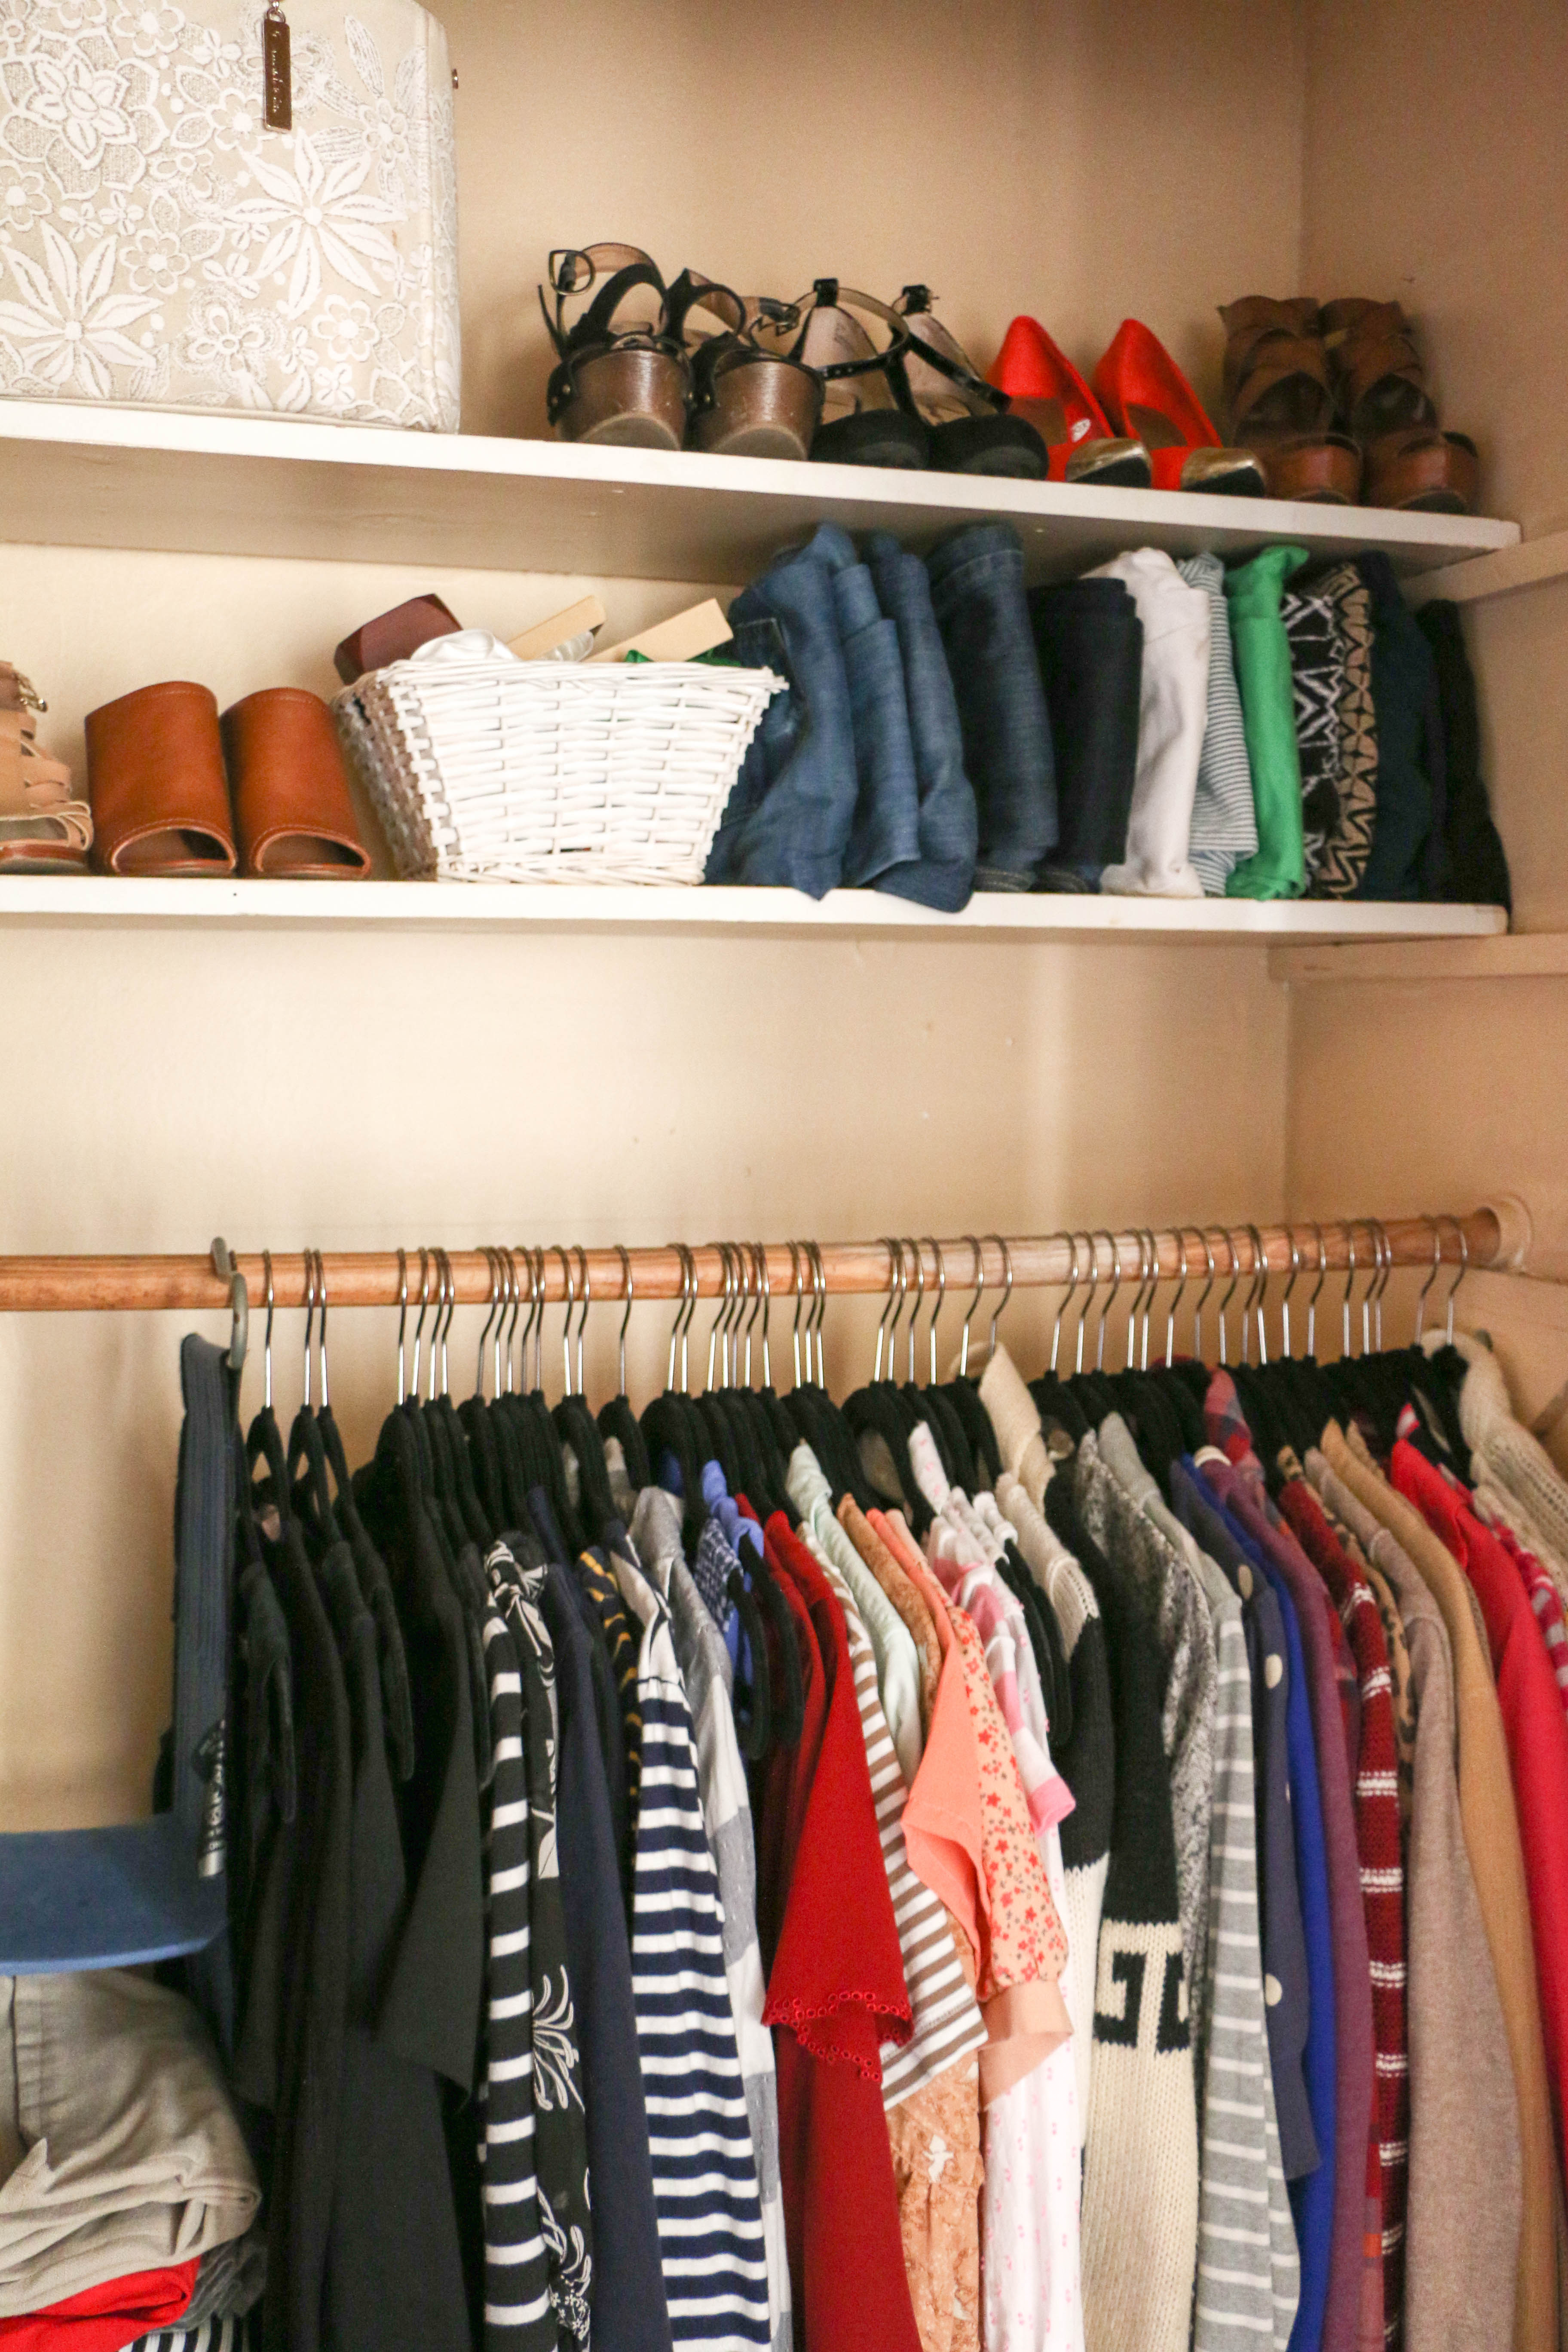
closet1

Step Four: 

Tidy up all the non-hanging items. On the top shelf, I have a few pairs of shoes, a handbag filled with other handbags, pants stacked standing straight up, and a basket with scarves and important jewelry boxes. I also have a small hanging shelf unit with a few folded skirts hanging from the rod. Notice how I have extra room on these shelves? Before I purged and organized, I could barely cram anything else in this closet, and finding what I needed was never simple. Now everything has a location, everything has a purpose, and it all looks generally appealing.

I feel like I should mention a few disclaimers. The floor if this closet hosts the majority of my shoes, which aren’t perfectly organized yet. Additionally, this is not the entirety of my wardrobe. My dresses are stored in Ethan’s closet, and coats and special occasion outfits are stored in the coat closet. I also have casual wear that is stored in Ethan and my shared dresser.

My overall point is this: this is no way near the dream closet I described at the beginning of this post. However, it makes me feel refreshed and at ease when I open the door. I will likely never have this fantasy closet, but I’m willing to love the closet that I have now. I know that later in life, I’ll move up in closet. Right now though, I’m learning to love the closet I have. Right now, this is my dream closet. Purged, organized, and accessible. Do you have your dream closet or do you have something you have to learn to love like me? How do you organize? I’d love to hear all about it! That’s all for today, friends. Have a fabulous day!

DIY Projects, Tutorials

Salvaged Wood Headboard DIY

It’s been a few weeks since we updated our bedroom and I am still living in a fairy-dream world because of it. I showed you guys the full result a week or so ago, and you guys have been so sweet about how it turned out. If you didn’t get a chance to check that post out, you can read all about it here. Today what I wanted to do was show you guys with a little more detail the headboard that I made for this space.

When I bought all the new pillows for the bed, I knew something was still missing. Our old headboard was a pre-blog DIY that was imperfect but served us well for the time that it did. I made it back when I was still unsure about the style direction I was heading in with our house, so it just didn’t quite work. And let’s be honest. I still don’t think I know the style I’m headed toward. Live and learn.

I wanted to make something, but I didn’t want to spend any money. Yes, you read that correctly. I wanted to spend zero dollars. Story of my life, right? I knew that I could only justify to Ethan building a new headboard if I could do it for free since I had just built one a year prior. Now that I think about it, I think Ethan has learned not to question my unreasonable antics. The other stipulation for this project was that I had to do it completely by myself. Normally our DIY projects are a team effort (and by that I mean Ethan does the work and I make it pretty). This time, before I knew what I was thinking, I told him that I was going to make this project for free, and I was going to do it completely on my own. Cue “On My Own” from Les Mis as I head to the garage to work on this project.

So here’s how it went down. A few months back, our neighbors were replacing a portion of their wood fence. I hoarded rescued some of the pieces and they have been sitting in my garage, safe from harm. I headed to my stash and chose the best looking pieces for the job. I (and when I say I, I do mean me myself and I. All by my lonesome) cut the pieces using a circular saw to 60″. We have a queen size bed, so that was the size we needed. If you were to do something similar, be sure to measure the size of your bed. I did wash these with warm water and soap, and lightly sanded them, just to make sure they were clean. And not going to give me splinters. Because those things are important, I guess.

So I laid out all the pieces on the garage floor to make sure I liked to order of them, since all the pieces were slightly different.

headboarddiy1

Then I used two cross pieces to screw onto the backside of my headboard. These pieces were vertical, and were 54″ tall. Our old headboard was a bit taller than this, but I always thought it looked kind of weird, so I was very mindful of how tall this one was going to be. I don’t know if there are official rules about how tall a headboard should be, but I think y’all all know that I make up my rules as I go when it comes to home decor. I wish I could show you the pictures of me screwing this together just to show off my brute strength, but alas, I did this one on my own. And I don’t have enough hands to photograph myself building a headboard. You’ll just have to trust me in the fact that I did make this.

headboarddiy2

After I screwed the back pieces together, I turned it around to paint it. It looked like this:

headboarddiy3

Technically, it didn’t need to be painted, I did like the way it looked like this, I just love lighter colors, so it didn’t really stand a chance. I used my dry-brushing technique, which you can read about here. It took about ten minutes total to paint. Have I mentioned that’s my favorite way to paint things?

headboarddiy4

The color is Mourning Dove by Behr, and I use that for tons of projects around the house.

After I let it dry (which didn’t take long with the amount of paint I used), Ethan helped me carry it into the house to put it behind the bed. So I guess he did help. BUT OTHER THAN THAT I did this one on my own, and I am so proud of myself. Picture me pridefully kissing my biceps.

diyheadboard9

 You can see more after photos in the original reveal post. I cannot tell you guys how much this little project changed the feel of our bedroom. And it was 100% free! This cheap-loving girl is jumping up and down with excitement over this one! I promise you, I am super wimpy, and I did this in an afternoon, so I know you can too!

All the sources for the items you see here are in my original reveal post, which you’re welcome to check out! I’d love to hear what you think about this project in the comments below, or you can find more on my Instagram. That’s all for today, friends! Have a fabulous day!

rusticheadboard

Home Decor

Quick and Easy Bedroom Update

Hi you guys! Thanks for stopping by! I am so excited about today. It’s the last week before Thanksgiving Break (I know y’all will hate me for saying this, but I get the whole week of Thanksgiving off!). I cannot even tell you how excited I am to have next week off. And we all know what comes quickly approaching after Thanksgiving, right… Not that any of that has anything to do with what I’m talking about today. But this teacher’s got a one track mind. What can I say?

So a while back (like several months back), Ethan and I were talking about some changes we wanted to make with bedding in our bedroom. We’ve only been married a little over a year, and the bedding I picked out on our registry wasn’t quite working out. I still have no idea what I’m doing when it comes to decorating, but I’d like to think I’ve learned a few things at least about what doesn’t work in our home. Maybe I’m completely wrong. Who knows?!

shutter21

Okay, so this is what our bedroom looked like beforehand. This quilt was just a light quilt that we used this summer, but this is the best photo I could find (why didn’t I take a better photo for you guys before I redid the bedding? I don’t know.) So the bedding you’ll see today is our permanent bedding that we’ve had. There are a couple of problems we ran into with this arrangement.

First, those pillows in the back are too long for the bed. Like, they’re falling off. What was I thinking?

Second, the gray patterned pillows are the ones we actually sleep on, and I don’t like that they’re in the front. I know that’s probably like the first thing you would learn in a design book. But let’s be real, I haven’t read a lot of design books. Because, in case you hadn’t noticed, I still have no idea what I’m doing.

Lastly, (and I can’t even believe I’m typing this) the light gray patterned sheets don’t hide sweat stains very well aren’t very aesthetically pleasing. In case you forgot, I am married. Which means a man sleeps in my bed. So while I’m all for solid white sheets, I do have a husband to consider.

So we decided we needed to change some things up. We were anticipating an extra bit of money, so we waited until then to purchase anything. Which ended up being several months. But what are ya gonna do? Most couples probably spend their money on more important things when extra money comes in, but lucky for me, I have a husband who agrees to let me spend our money on what’s really important. Like throw pillows. He’s kinda the best. Okay, so here’s what I came up with:

diyheadboard9

So what I actually purchased were the sheets and the throw pillows. I am liking this arrangement SO MUCH better.

diyheadboard8

So the sheets are these from Target. I wanted to get something neutralish, but would still be dark enough that everyday wear wouldn’t be too evident. I’m a total white lover when it comes to pretty much all things home, but in this case I made an exception.

The white shams came with the bedding but we had never used them before. I was happy to pull them down from the closet and put them on some NORMAL sized pillows. Not ones that are literally falling off the side of the bed.

diyheadboard6

The blue throw pillows have a super soft velvet-like finish that I got from Pier1 imports. I was surprised to find out at the register that they were also on clearance. So hello, happy shopper here! They come in a wide variety of colors, and they’re super comfy!

diyheadboard10

The long throw pillow in the front is my favorite of all! I found it at HomeGoods. Funny story about it. I knew I wanted something of this shape for this spot, but I couldn’t find just the right thing. So we were at HomeGoods one weekend, and Ethan found this same pillow with yellow trim. Which of course would have been perfect if it hadn’t been yellow. I told Ethan, “I wish we could find the exact same thing, just with gray trim instead!” But they had no such thing.

So what do you know, the next day we were at a DIFFERENT HomeGoods (don’t question how often we go there, okay?), and I found this one! It was like the pillow heavens opened up and smiled down on me that day (it was also five dollars cheaper than the original yellow one I found).

diyheadboard11

I think the sheets and pillows went a long way here, but in case you didn’t notice from the first photo…I impulsively changed the headboard too! I made it by myself for completely free, because I didn’t think the old headboard worked well with the new bedding. Plus, I’m fickle and I just changed my mind too quickly. I’m going to do a full separate tutorial on the headboard, but I do think it’s the thing that brings the bedding together.

diyheadboard7

Stay tuned for that tutorial! I’m so happy with how this mini bedroom refresh turned out. I brought in so few new pieces, and the result is something I really love. I hope this inspires you to change things up at home, even if it’s just moving pillows around! 🙂

That’s it for today friends, have a fabulous day!