Browsing Tag

Tutorial

Holidays, Tutorials

DIY Pinecone Ornaments

I know it’s still early….but I have begun decorating for Christmas at our house! Last year, we got a real Christmas tree, which I loved having. They smell so good, and they’re so nostalgic I think. The only downside to them is that they don’t come out until early December because they don’t last very long. Which I suppose I can’t be upset about, but I was so impatient this year that we went out and got an artificial tree. I had too many decorating ideas that I couldn’t wait to get started.

So, now that our tree is up, I wanted to share with you a few of the quick projects I did for our tree. If you know me at all, I’m all about finding the cheapest way to do things, and so I created a few different types of ornaments on a shoestring budget. For our tree this year (and all of the decor, really) I wanted to go with a very natural, rustic-y, theme. I had a hard time putting into words exactly what I was going for, even to Ethan. I just kept saying to him, “I want it to look like how the pioneers would decorate a tree if they had one.”

As if that even makes sense.

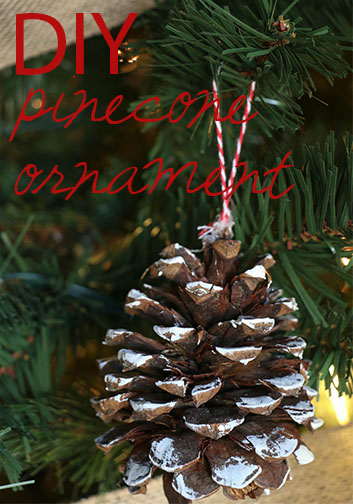
Anyway, today I’m sharing how I turned regular pinecones  into ornaments for our tree. This is so simple, it’s even kid friendly!

pineconepaint

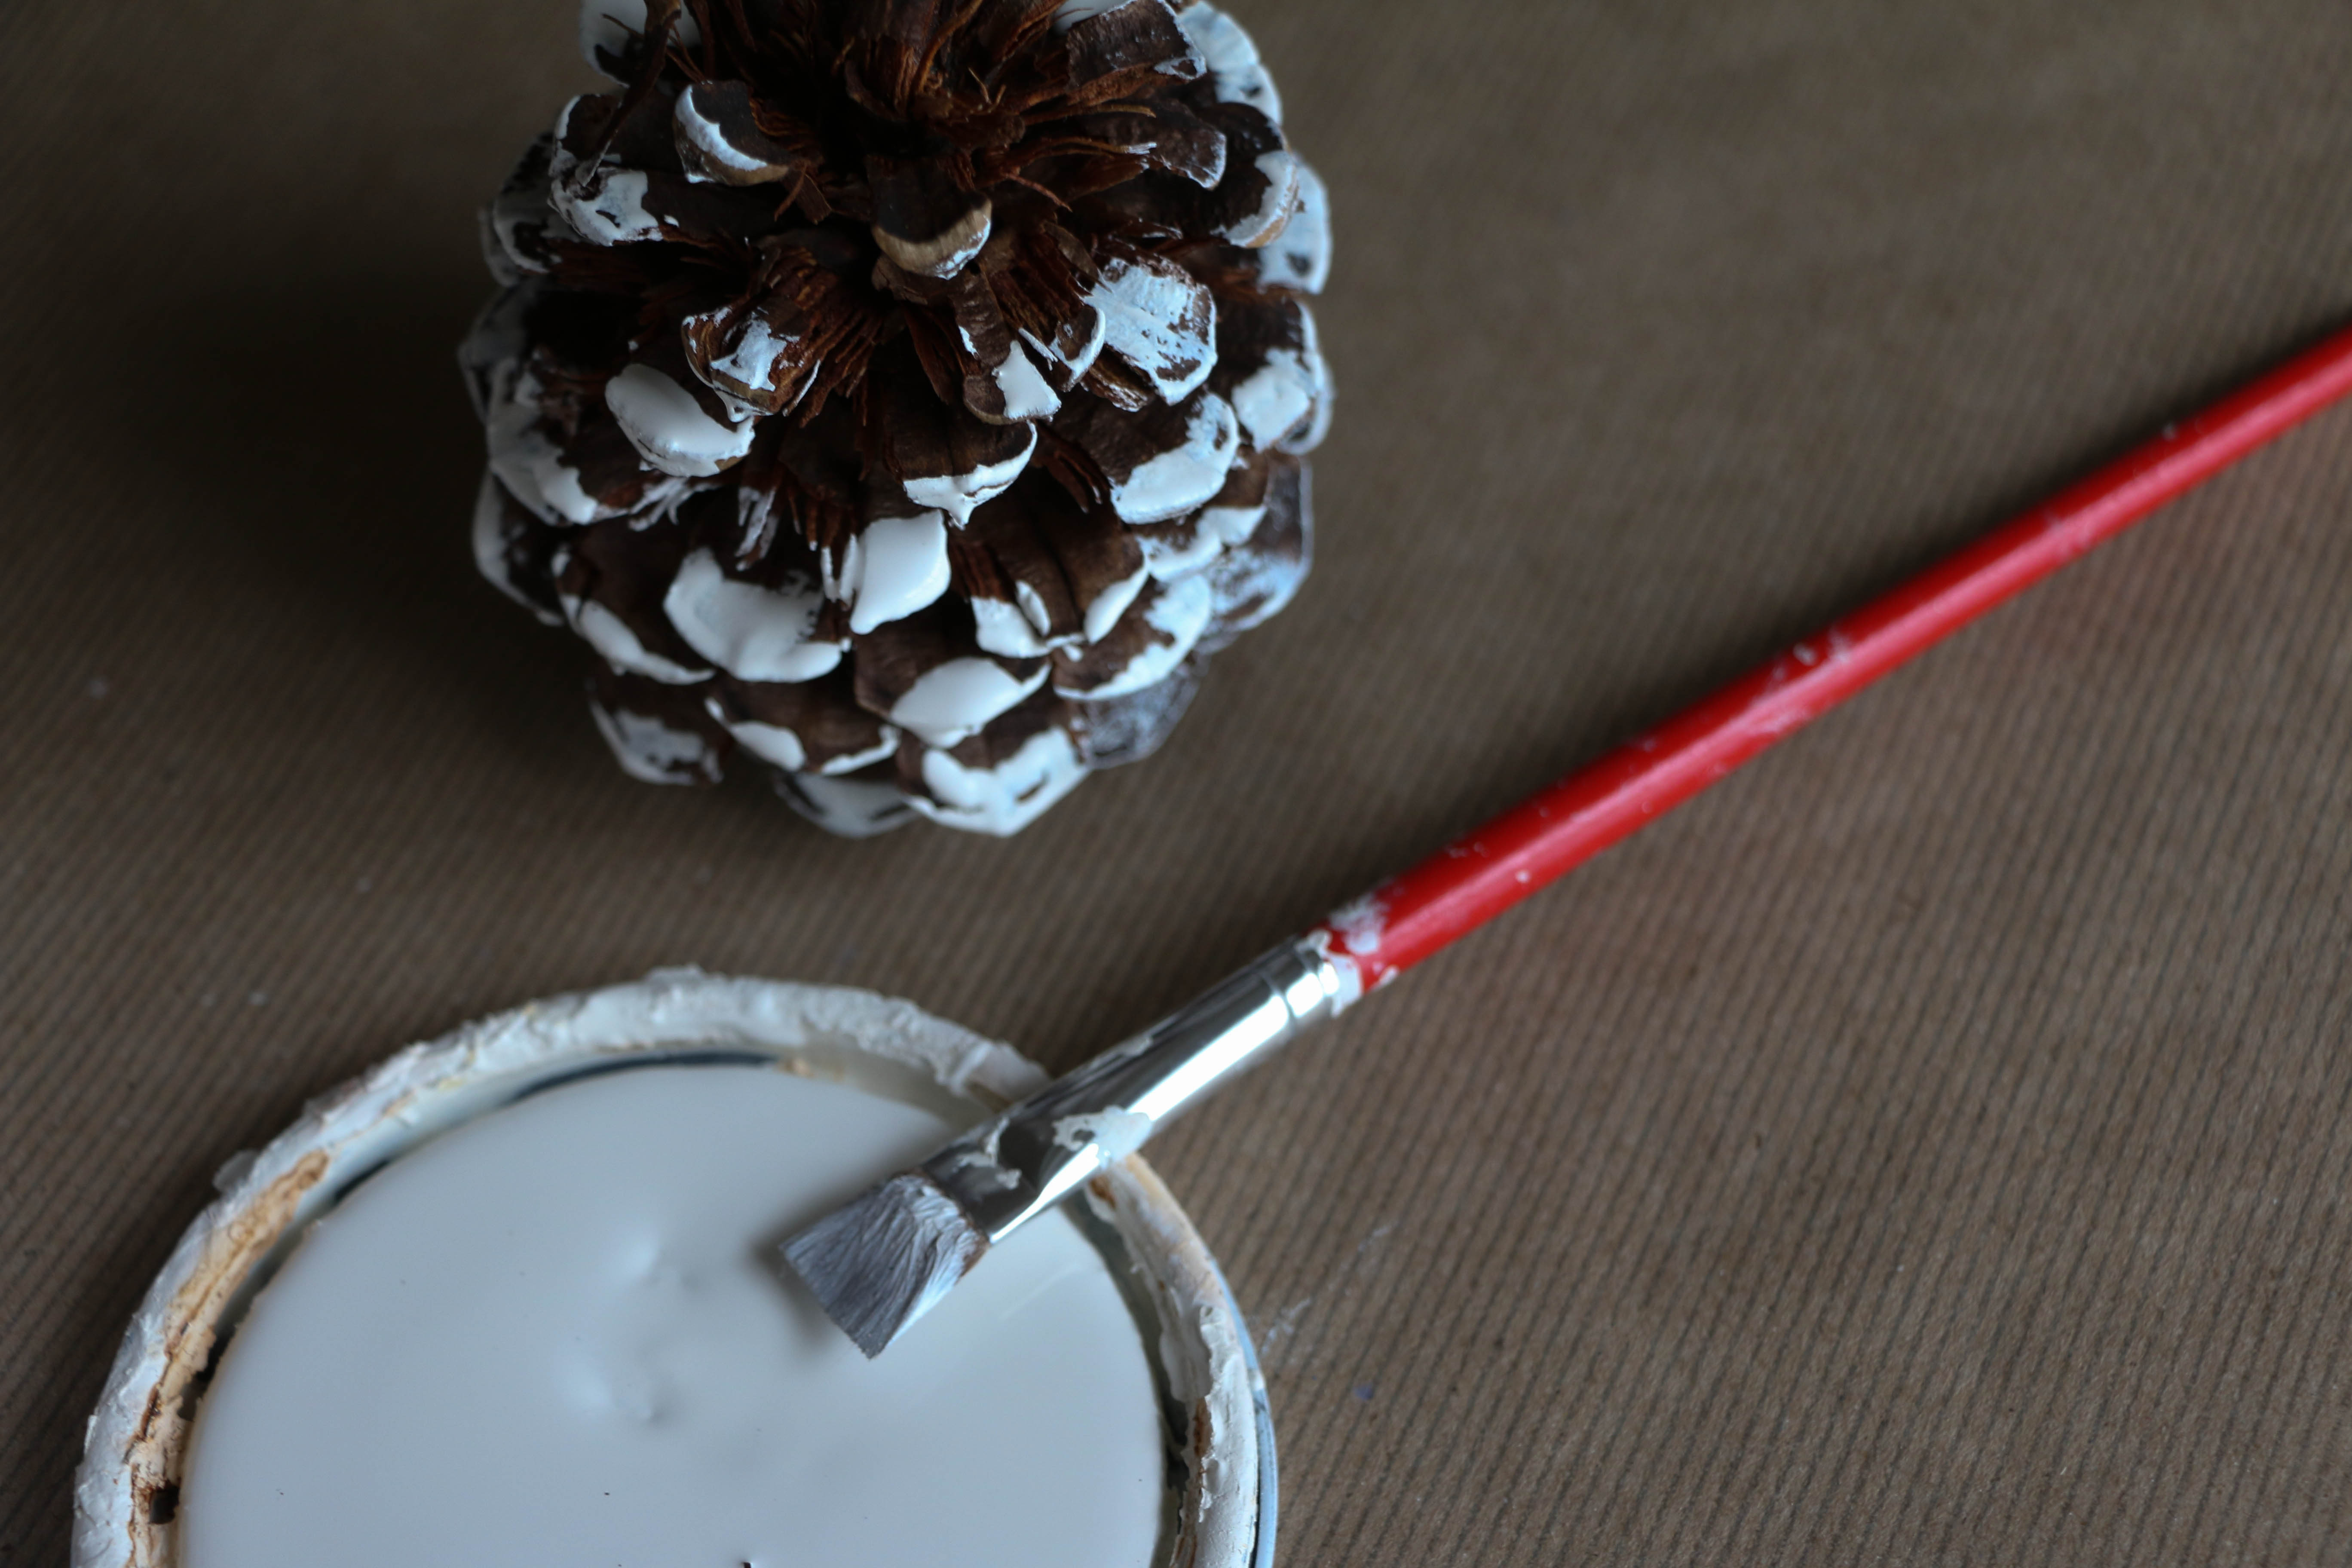
I painted the edges of several pinecones using some paint I had on hand. The color is Mourning Dove by BEHR. I’ve used it for a lot of projects, and it’s one of my favorite off-white colors. I didn’t worry about painting too neatly, I just kind of quickly brushed on the edges of the pinecones. I wanted to make it look like snow, because, you know, that makes total sense in Texas.

pineconeglue

When that was done, I put a dot of hot glue into the top of the pinecone. I tried to tuck it down inside so that hot glue wasn’t too visible once they were hung on the tree. pineconeornament

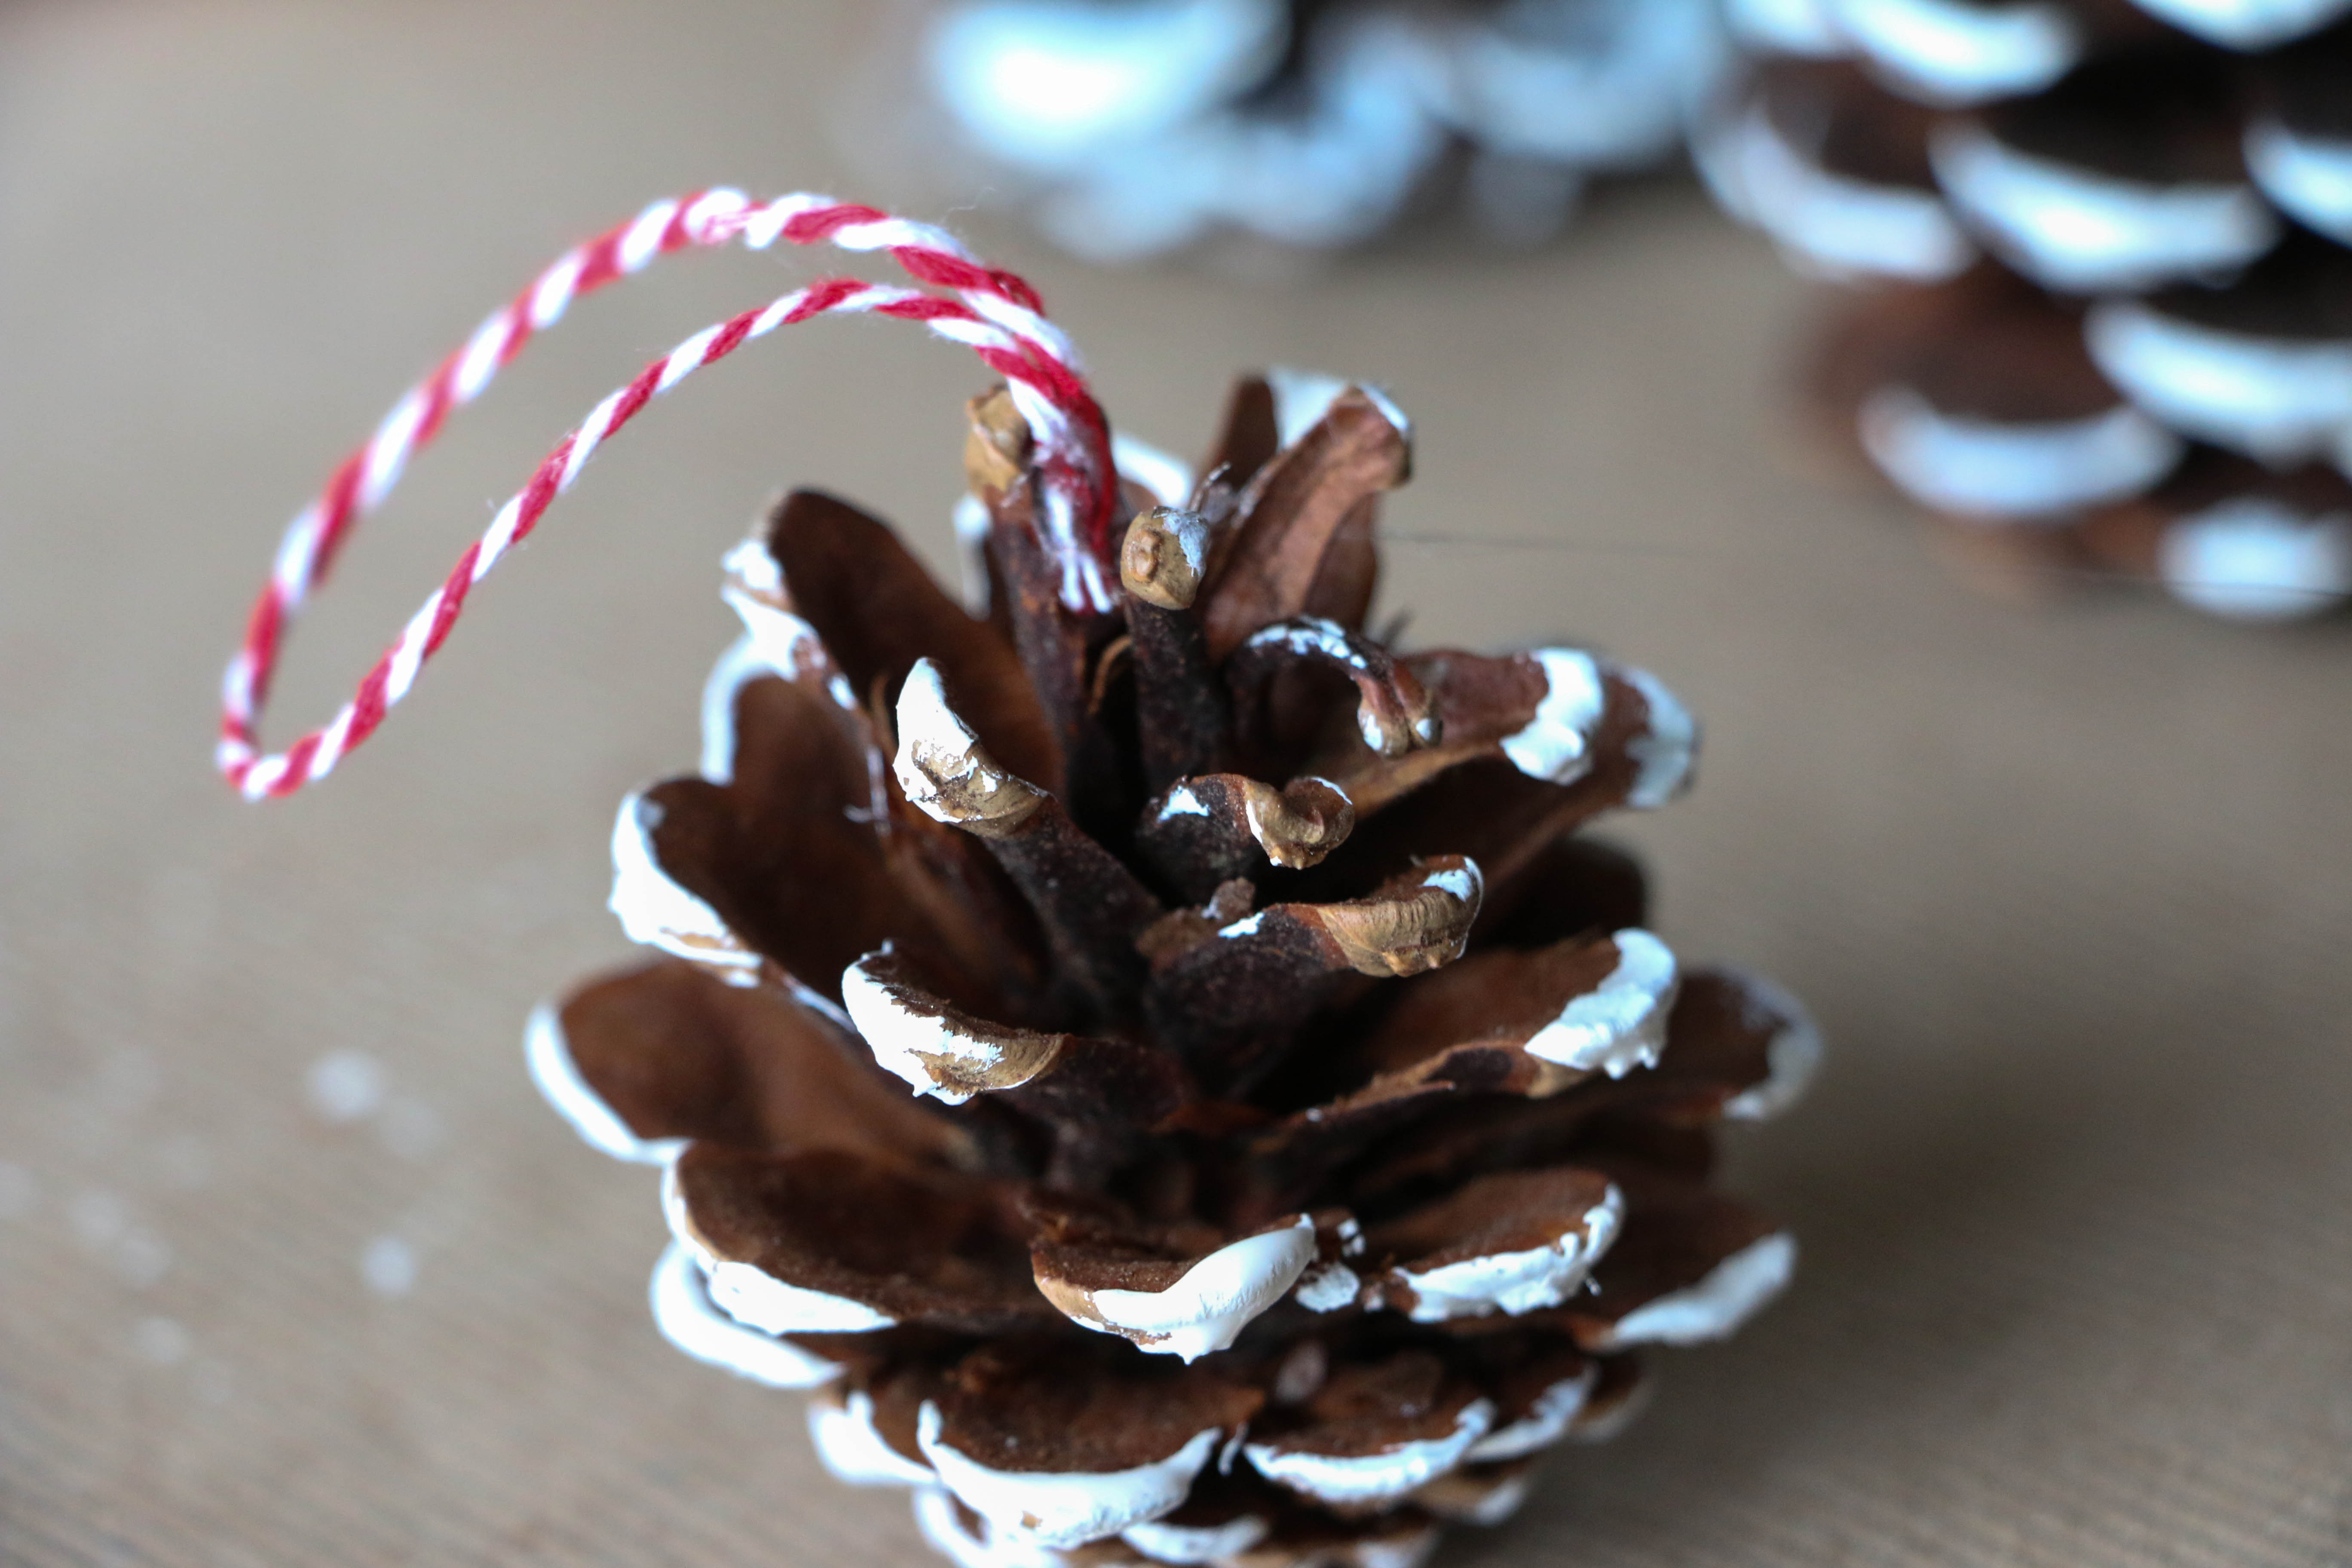
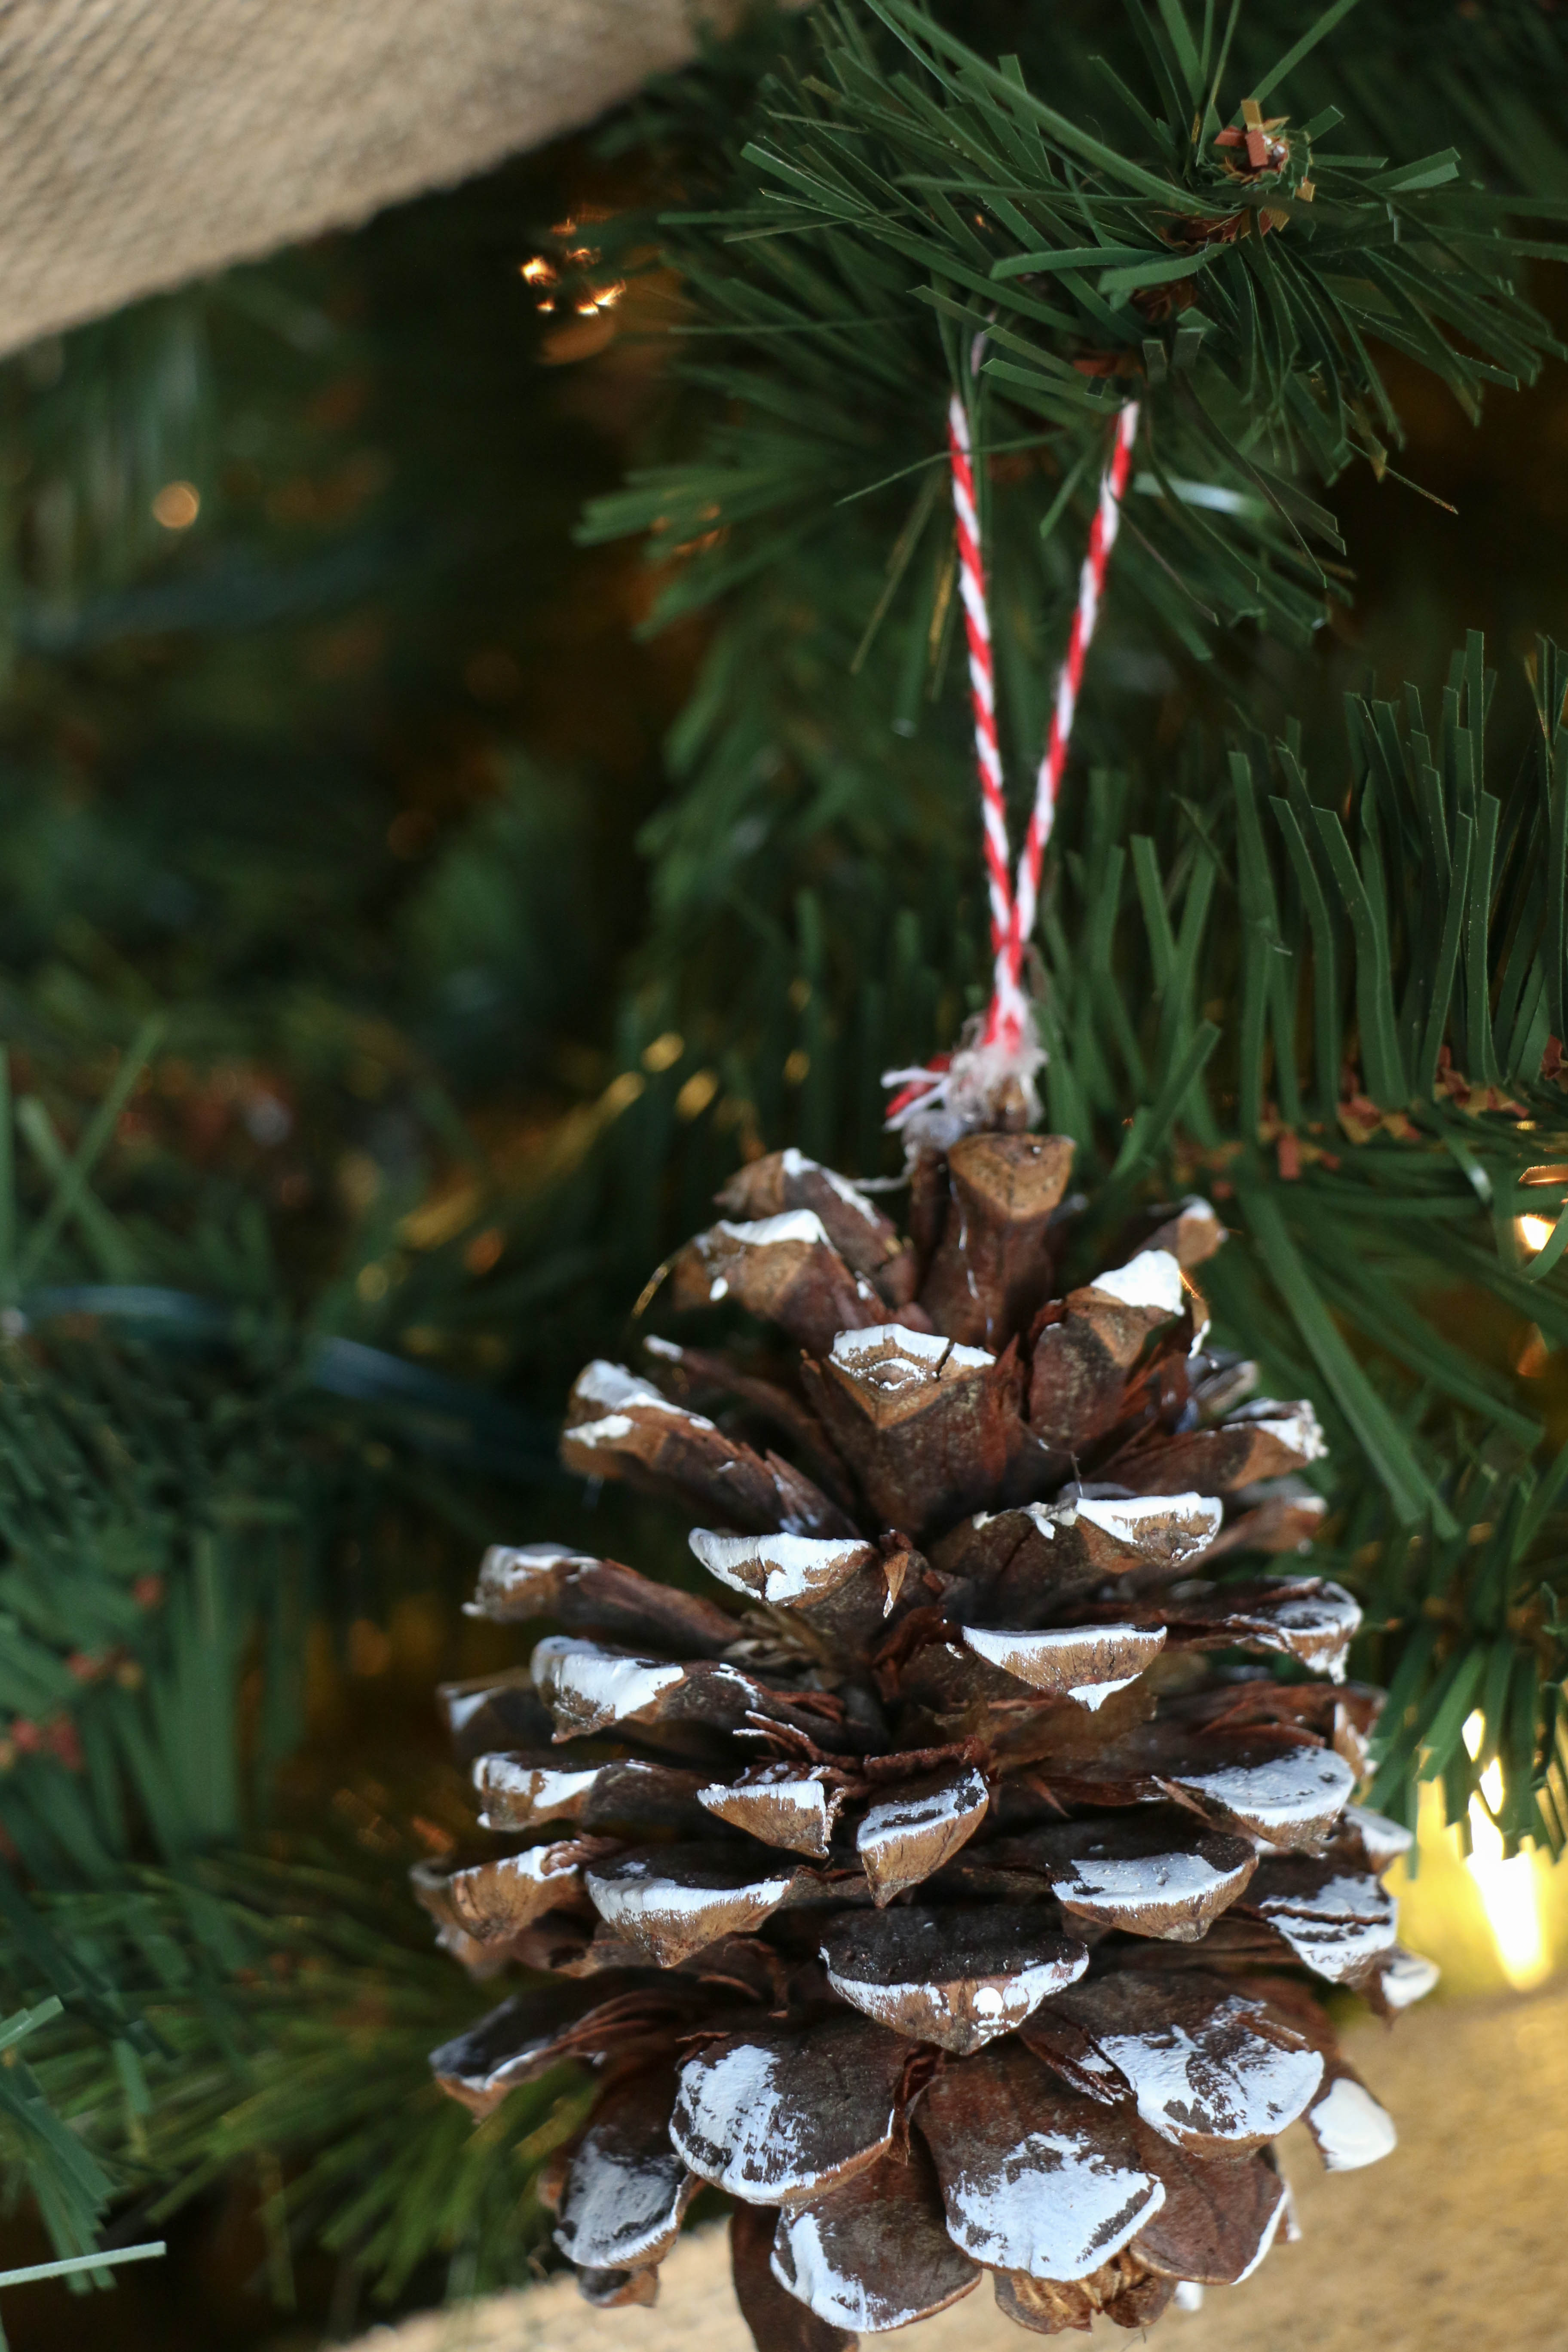
I added about a four inch piece of red baker’s twine in a loop to the hot glue. I bought the twine from the Target dollar spot. Can we just give a quick shout out for the Target dollar spot?! I swear, that place is like magic. Anyway, I chose red so it would have a little Christmas-y pop. And when it was done, it looked something like this:

pineconeornament2

This is by no means an original idea, I’m sure it’s been around for ages, but it’s something I whipped up super fast, and I wanted to share with y’all. I don’t have kids, but this could easily be done with little ones…it’s THAT easy. Plus (in my personal opinion), super cute. I’ll be sharing a two other ornament ideas soon, so stay tuned!

I hope you give this one a try! I know I’ll be enjoying them this season.  Well, that’s all for today friends, have a fabulous day!

DIY Pinecone

DIY Projects, Holidays

How to Make Your Home Feel Super Cozy

Hey y’all! I hope your week is going well! Fall has still not arrived here in North Texas, but we’re pretending. My students are busy making pumpkin crafts, and I’ve been drinking tea nonstop at the house. Even though it’s in the eighties every day still, I’ve broken out the boots for work. Call me crazy, but I’m not wasting my time when it comes to all things fall. #sorry #notsorry

Anyway, today I want to share with you something I like to do at home during the fall. And all the time, really, but during the fall it seems especially appropriate. I don’t know what it is about the month of October, but it makes me want to cozy up EVERYTHING. For me, cozy equals good smells. There’s nothing like a warm home that smells heavenly.

So here’s what I do. This isn’t even a DIY because it’s the easiest thing possible. IMG_2414

I like to take a few lemon slices, a sprinkle of cinnamon, and some cranberries (or in my case, dried cranberries, because that’s all I had on hand), and put them on the stove with just enough water to cover the fruit. I put them on a low heat and simmer alllllllll day long. Seriously, it is ah-mazing. I have to check and refill the water every once in a while, because the water will evaporate over time. Other than checking on it every now and then, there’s nothing else to it. It makes the house SO COZY. I kid you not. It puts me in a great mood, and the house just feels homey. Does that make sense? It might sound weird, but a house that smells good feels like home to me.

Fall makes me go into major nesting mode, and start doing lots of things around the house. This ‘recipe’ makes everything better. It just feels like fall. If fall is a feeling, this is it. If you try it out, I promise you won’t be disappointed. There are also other things that you can simmer in the pot like vanilla, oranges, lavender, pine needles, etc. Cranberries + lemon + cinnamon just happens to be my favorite combination. Find a combination that works for you, and run with it! I do this all the time and I cannot recommend it more. It’s the simplest of things and it totally makes me feel like Martha Stewart (even though there zero skills involved).

I hope you do try this out at home, it’s super easy. Have you already done something similar? I’d love to hear about it. Do you have a better recipe? I’d love to hear about that as well. Thanks for reading along. That’s all for today, friends. Have a fabulous night!

smelfall

DIY Projects, Home Decor

DIY Console Table

Guys. School has started and this first grade teacher is T-I-R-E-D. #isitsummeryet? Despite my tiredness and all my extra beginning of the year school year work, I managed this super quick project.

Our house doesn’t have a formal entry way, so we’ve been living with a makeshift chair-and-coatrack-in-the-corner deal. I wanted to add a console table in our living room to fake a bit of an entry. This project was so easy, it took mayyyybe 45 minutes in total. I used an antique sewing machine base as the base for my new table. I found it at a flea market and I love it! I then added a wooden planked top, and BOOM! Project done. (Well not quite, but keep reading for the details.)

salvagedwood

We had a bunch of salvaged wood from a home in our neighborhood. It’s probably about 80 years old and LOOK AT ALL THAT CHIPPY GOODNESS. I didn’t do a thing to the wood. I wanted it to be all chippy-rustic-like.

consoleback - Copy

I laid the planks on top of my workspace and placed boards across them. I just used a hammer and nails because the wood is a bit fragile, and because it’s really a simple project.

After securing the boards together, I placed them on top of my base. (Total nonprofessional here): I didn’t secure the top to the base because I think I may change things up a bit in the future. I figured it wasn’t a big deal because this table won’t be getting a lot of wear-and-tear. But don’t trust me. I’m not a professional.

And here is the finished product:

consoletable2 - Copy

I love the rustic element it has! This was a super simple project, I almost feel like it’s too simple to share, but whatevs.

consoletable3 - Copy

Here’s a closer look at all that paint texture. And sidenote, a super cheap art trick I use is displaying handwritten phrases on clipboards.

consoletable1 - Copy

I’m still having to re-adjust my habits when I walk in the door, since this is where our coatrack was. Other than that, I am obsessed with this little table! It was so easy! It’s one of those “why didn’t I do this earlier?” things.

Have you ever made something like this? I’d love to hear about!

That’s all for today, friends. Have a fabulous day!

Untitled-1

DIY Projects, Home Decor, Tutorials

DIY artwork for cheap

Hey y’all! I hope you’re doing well! Summer is winding down over here, and I’ve been super busy with preparing things for my classroom this year. I will pick up the keys to my classroom next week to begin setting up for the school year. I’m excited for this school year, but I’m sad to see summer go! Since I’ve been so busy with classroom projects I haven’t been working on house projects too much lately. I did however, whip up a couple of these easy “art pieces” to use in the house.

I can’t even call this a tutorial because it’s so easy! More like an idea you may not have thought of. I have done this several times throughout my house, because it’s SO easy and SO cheap. I think for this project it cost me a total of $4. Whoop-de-do!

I found these old frames at a thrift store for $1.

 before2

Those ducks are so cute, aren’t they? Kind if a 90’s chic, if you will.

Literally all I did was spray paint the mattes and frames and replace the duck print with a cute printed paper. I got mine from Paper Source. I like to get papers from there because they come in 20×30 inch sheets, which is convenient for many different projects. They also have so many pretty papers! You could also do this with any gift wrap or scrapbook paper.

paint1

I used this spray paint because it’s what I had on hand. I spray painted them, and once they were dry, I added the new paper, and done. That’s it!

after1

after2

I realize this is kind of an obvious DIY. But it’s so so easy, you have to give it a try! That’s it for today friends, have a fabulous day!

DIY Projects, Tutorials

My Experience with Annie Sloan Chalk Paint

Hello everyone! I hope you’ve had a marvelous weekend, I know I have! I am in New York visiting some family, but I wanted to take a few minutes and make sure I wasn’t neglecting the old blog. 🙂

So last week I blogged about my new dining room table. If you haven’t checked that out, go ahead and do so. It’s cool, I’ll wait. I want you to have a frame of reference when reading this post. Okay, you read it? Cool, let’s continue.

I painted the table and chairs using Annie Sloan Chalk Paint. If you haven’t heard of this paint before, you are really missing out. Seriously, this stuff is awesome! It’s called chalk paint not because it creates a chalkboard finish, but because of its matte look. It has a “chalky” feel to it when the paint dries. There is no sanding or prep work required with this paint (can I get an amen?!), and it will adhere to most any surface. Did I mention it has no VOCs? Pretty cool stuff.

Annie Sloan is a company based in Britain, so while you can order online, there are only limited stockists in the United States. You can click here to find a stockist near you. I got mine from Nest, a cute little store in Mansfield, TX. It is suggested that you take a workshop to learn about the paint before tackling any big projects, but being the rebel that I am (mostly I’m just cheap), I opted to just try it for myself. I did do some internet research, and Lauren over at The Thinking Closet has a great tutorial on this topic as well. I referenced her post several times during my project.

So let’s get down to it, shall we? First off, I chose my color, Old White.

IMG_1426

This color is a not-quite-cream-not-quite-pure-white color that’s perfect for my space, so I went with it. The actual application of the paint is easy-peasy. I’m assuming you know how to dip a paintbrush in a can and slap it on something. I won’t insult your intelligence.

While the can states that one coat will be sufficient, I found this not to be true. Pardon the HORRIBLE lighting, but you can see here with just one coat, there were still visible areas. Now, these chairs are not solid wood, so that may be why it took more paint, I’m not sure.

IMG_1333

Overall, I did two complete coats, with a third coat over some small areas. If you look closely in this picture, you can see the defining line between one coat and two coats of paint.

IMG_1356

This paint dries quickly and is very easy to distress, if that’s the look you’re going for. If so, you would simply sand down the edges you want distressed and be done with it.

After your paint is fully dry and distressed, it’s time for the wax. I applied the wax the next day. This is the part that is unique to this type of paint, and the main reason a workshop is suggested. I however, did not attend a workshop and didn’t have any problems.

IMG_1386

There are suggested brushes for applying the wax. I used a regular old cheap brush from Home Depot. You will want to make sure the paintbrush you use will be solely for wax. You won’t want to mix your brushes used for paint with your brushes used for wax.

You will want to apply a small amount of wax to your brush, brush it onto your piece, and then immediately rub the wax into the piece using a dry cloth. This allows the piece to have the wax fully worked in. It also removes any excess wax. THIS IS SO IMPORTANT. If you have too much wax, it will leave a tacky residue on your finished project and that’s just no good.

It didn’t take me long to completely abandon the paint brush (this is not the professional way to do this, but it worked for me). I would dip the cloth into the wax, and apply directly from the cloth.

IMG_1412

In my opinion, this was much easier than using a brush, since I applied and worked in the wax in one cohesive step. It also eliminated brush strokes in the wax.

Wax During

By the time I was done, my cloth was pretty oily, so I took a clena cloth and wiped down the entire surface once more. I did not have any issues with tacky wax after drying. I waited another day after applying the wax to place my furniture back in my dining room.

IMG_1514

I am totally a novice with this product, but I’d say I had a pretty easy experience with great results. I would definitely recommend doing a little research, but if you’ve been hesitant to try it, DON’T BE! I had a really good experience with it, and I know you can too!

Annie paint text

That’s all for today! If you have any questions, please let me know, and I’ll try to answer them as best I can. Have a fabulous day, friends!