Browsing Tag

vintage

Holidays

Vintage Inspired Christmas Decor

Can you believe the holidays are already upon us? It seems to come faster every year. I know it’s a little early, but I’m already thinking about my holiday decor. I usually try to keep some kind of theme or color scheme throughout my decorations so I don’t get tired of the same things year after year. Plus, I enjoy creatively putting together a new arrangement.

This year, I’m going for all things “Grandma’s House.” If I can imagine it being present at my grandmother’s house, it’s in. I’m looking back at midcentrury family Christmas photos and drawing inspiration from them. My biggest triumph this year has been slowly collecting boxes of Shiny Brite ornaments throughout the year at estate sales. You know the ones: the simple colorful ball ornaments. And of course, lots and lots of icicle tinsel.

I gathered up some holiday decorations that give of the Grandma’s House vibe, in case you want that vintage look this year too, without the time commitment of searching high and low for authentic vintage pieces.

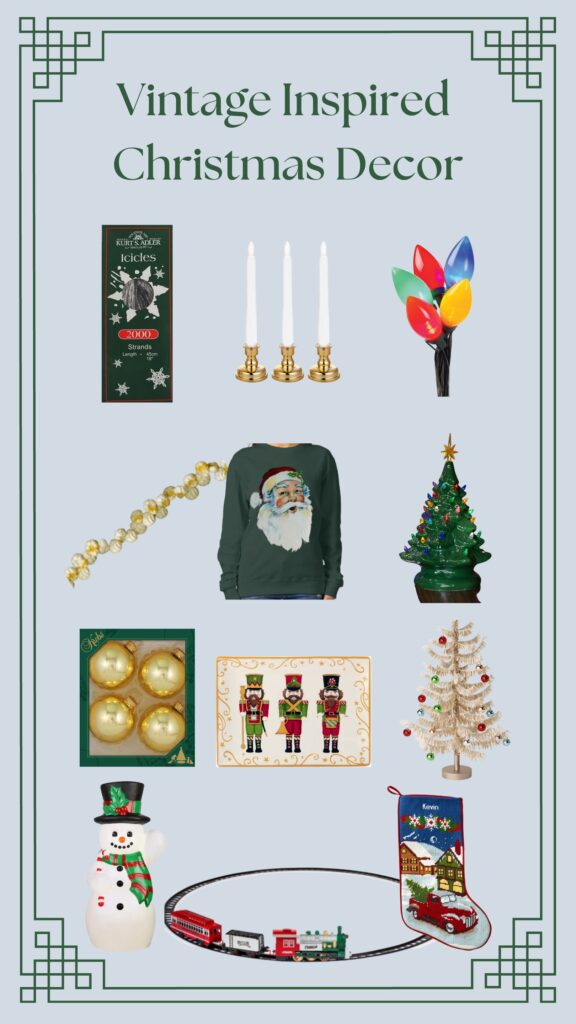
Icicle Tinsel – I think this is the biggest impact for that classic look!

Window Candles – I bought a set several years ago and have been so happy with them. The house looks so cozy every time we drive up in the evening. They are on a timer too, which is so nice!

String Light – I remember my Great Grandmother’s tree having the giant C9 bulb lights, and it would be so well lit, the whole tree was radiating heat. These are LED so you won’t have to worry about the fire hazard like the days of old, but there’s something so sentimental to me about the big old string lights.

Popcorn Garland – I strung my own popcorn string, and you can totally do that too, but if you have dogs or children prone to eating edible things off the tree, they make artificial popcorn garland! Consider my mind blown.

Santa Sweatshirt – I had to include this because it’s just so cute!

Ceramic Tabletop Tree – You know your Grandma had one of these!

Classic Ornaments – These are the closest I could find to that old style classic bulb ornament. They come in lots of colors, so with a good mix of colors, you might be able to trick the eye into thinking they’re older.

Nutcracker Serving Platter – Is it even Grandma’s House without a kitschy serving platter? So cute for cookies!

Mini Tinsel Tree – This would be so fun on a tabletop or in an office!

Snowman Blow Mold – I have seen old blow molds at flea markets and antique stores plenty of times, but I had no idea Home Depot still made them!

Christmas Tree Train – Last year, we went on a Christmas home tour, and one of the houses had a train around the tree. My son, who was three at the time was absolutely mesmerized. It’s so joyful for kids and adults, I think!

Needlepoint Stockings – and of course, it wouldn’t be a vintage style Christmas without needlepoint stockings! Now, if you don’t have the antiquated skill of needlepoint (me!), you can buy them! These come in a bunch of different patterns and you can have your family member’s name embroidered on it!

I hope you have fun decorating this year, and however you choose to decorate, it brings you that warm and sentimental feeling of Christmases gone by. That’s all for today, have a fabulous day!

Home Decor

When “Your Style” Seems to be Changing

Have you heard from design magazines or HGTV shows about finding “your style” and sticking with it? For the last four years as I’ve been making our two different rental houses home, I’ve been drawn to a farmhouse-y, cottage-like style characterized by lots of chippy, white, antique-y looking things. I’ve sourced all kinds of materials from flea markets, and made things we owned to look older by distressing them.

I started a business refinishing furniture and sourcing antiques and I have done well for my home and others’ homes using all things “farmhouse style.” But guess what? Can I tell you these possibly forbidden words? I’m starting to get sick of it. Whaaaaaaaat? Am I even allowed to say that? Let’s backtrack a little bit.

In my personal style (the clothes I wear and how I present myself), I generally use words like classic, erring on the side of “preppy” using lots of neutrals and blues. I try to stick with only buying pieces that won’t be out of style in five years. But guess what? Would you believe that in high school, for a short time, I was really into duct tape. As in, I made myself all kinds of accessories out of colored duct tape. Belts, purses, wallets, bracelets, you name it. Now, does this fit in with the classic, natural, timeless way I try to present myself? Absolutely not! Because it was a phase and I moved on past that phase.

I think you may be able to see where this is going. I am going to step out on a limb here and say that in our homes, we’re allowed to have phases too. We don’t have to stick to something that we picked five or ten years ago just because that’s what we chose and now we’re stuck with it. So that brings me back to my own home. I have been a lover of the modern farmhouse vibe in all it’s white and gray and chippy paint glory for several years. But I sense myself moving beyond that.

Don’t get me wrong. I love antiques. I love shopping flea markets. I don’t see myself stopping that trend and solely shopping Target from now on. But I feel that I may be moving (or trying to) toward a more timeless, classic and traditional look in my home. Not so shabby chic, but polished. This is going to be a process. I’ve always been on a budget, so there’s not going to be room to re-furnish our entire house just because I don’t like our stuff anymore. No, I’m going to do things as I always have – slowly evolving over time.

Take this vignette for example. White on white, some galvanized metal, twine, distressing. These are staples in my design choices and have been for a long time. Yesterday, I made some small and simple changes to this vignette. Because one teeny tiny change can make you feel like you’re doing something, even if it’s not an entire house or room.

I took some matte black spray paint I had in the garage and gave these candlesticks a new look. I swapped out the distressed jar for a basket-weave candle holder. I added this antique medicine bottle. But that’s it. Everything else is the same. The flowers, the greenery in the jar in the back. I didn’t change the table (though that’s on my list), the tray, the furniture along the wall.

I took a tiny step in the direction I want to move toward. I don’t know what words you might use to describe the look I have in mind. I have words like “neutral,” “traditional,” and “casual” in my mind. I am loving elements of matte black, natural textures like jute and basket weave, and dark brass. I was looking around my house and realized I don’t have a thing in it that’s black! Good thing I know my way around a can of paint. 🙂

I plan on slowly replacing things like furniture and large decor items on a budget, and you can bet I’ll bring you all along for the ride. I will sell some things like my dining room set to make room for new things (are you local? My dining room set that I refinished (click here for the original posting details) will be for sale soon!). Slowly, over time, I’m going to move on. Because if I can get past the high school duct tape phase, I can get past this modern farmhouse phase too.

That’s it for today, friends! Have a fabulous day!

Personal

Five Things I’ve Learned Running a Vintage Booth

Hey y’all! I am just coming out of a great weekend, and while it’s fresh on my mind, I wanted to share with you everything! This weekend I had a show with Vintage Market Days, which is my favorite event, both as a shopper and as a vendor. This was my second show with VMD, and I have continued to learn so much now that I have two shows under my booth. I still would consider myself a novice by all means, but I’d love to share the top five things I’ve learned, should you ever consider running a booth yourself!

Style the booth like a room. 

The first thing you want to do is think about your booth as a room. You don’t want to just randomly place furniture around a room in your house and call it a day. You think carefully about walkways, flow, and how you decorate. Think carefully about how to piece things together. I added walls to the back of my booth, a portable faux shiplap backdrop that I could hang things on. This created not only the feeling of being in a defined space, but also gave me vertical space to display things on. That is huge! Your house has walls where you hang things, so should your booth! You may be placed up to a wall, but chances are, you’ll be backed up against another booth or an ugly wall. Put something up so you can make your booth look homey! The shiplap walls were a big hit, and I am so impressed with how Ethan made these!

Think big! (But also small.) I would consider myself to run a redesigned furniture booth. However, not everyone who walks into a market is going to be in the market for (or have money for) a large furniture piece. I don’t know how many times people walked by my booth to admire my farmhouse table but walked away saying but I don’t need a table. People won’t usually spontaneously purchase a large furniture piece, but they will buy something small. Have items at all price points! I had pieces ranging from three to five hundred dollars. Make your items mass appeal. This doesn’t mean you have to offer things that aren’t true to your style, but bring things in that can match anyone’s price point. Even though I have furniture in my booth, I made most of my sales on small items.

Constantly rearrange. 

Things will sell. Even if you have your booth perfectly styled before the market starts, things will sell and leave gaping holes in your booth. You have to be quick on your feet and be able to move things around to constantly make the booth presentable. Another vendor gave me some great advice this weekend and told me not to be afraid to rearrange during the show. It will make shoppers less intimidated to come in and check things out, plus it brings different items to the attention of shoppers if they walk by more than once. Someone may think they’ve seen everything, but when you rearrange, they may notice something they haven’t seen the first time around. They’re much more likely to stop and shop!

Make friends with other vendors! 

Other vendors are a wealth of knowledge. Everyone has different experiences and expertise, and they all have something to offer. And the best part is that if you’re warm and friendly, they’ll be warm and friendly in return! As someone just starting out, this is huge! They are so generous with advice and tips, especially those who have been doing things for a while. You never know who you’re going to be set up next to, so make sure you learn everything you can from those around you!

Be mindful of logistics. 

Lastly, don’t forget about the logistics. Bring canvas dropcloths if you’re on a dirt floor. Bring change for cash buyers. Be prepared for shoppers to pay with card. Bring tools, because something will invariably go wrong. Bring chairs for sitting during the show. Have a plan for load in and load out, whether that means a truck, trailer, or strong muscles. Make a list and check it more than once, because you’ll always forget something.

These are just some of the things I’ve learned, but I feel like I’m way more experienced than I was before! Each show is a learning experience, and I am so thankful to have the opportunity to continue to grow this little side business I have. It’s exhausting, exhilarating, and exciting at the same time. Creating the pieces for these shows and seeing my ideas come to life is an indescribable feeling. Have you ever thought about becoming a vendor at a craft fair or antique market? I hope these tips help you out!

Well, that’s all for today friends! Have a fabulous day!

DIY Projects, Furniture Makeover

DIY Antique Farmhouse Dresser

Hello friends! Happy Monday! Today is good day for a good day, am I right? I’ve been super busy lately with projects and it is a wonderful feeling! Last weekend Ethan and I cleared out our garage, which gave me plenty of room to work. We organized all my materials, and made a place for everything.

It used to be super full and I barely had room to work on anything, but now that it’s all clean, I’ve been super inspired to work on projects in there. It feels like I can finally breathe!

One of the projects that I finished up this week was this little antique dresser. I snagged this dresser up from a friend who was selling it at her garage sale. I saw it and knew I had to have it! And because I am the worst at taking before pictures, you’ll just have to use your imagination. It was just plain brown and missing a few handles.

Well, I painted her up, and here she is in all her antique farmhouse style glory:

Okay, so with this project, I tried something new. I knew I wanted it to be super distressed, and rather than use my sander, I wanted to try the Vaseline trick that furniture painters everywhere have been talking about. So I applied Vaseline all on the edges of the dresser. (Basically where you see distressing is where I applied.) I found that it was easiest just to use my finger rather than messing with a paint brush.

After I applied my Vaseline, it was time for paint. I used Palais White by Behr in a flat finish. I painted everything evenly, including the areas that where I had used Vaseline. Now here’s where it gets tricky. My dresser needed two coats. Being the impatient person that I am, I could not wait to see the effects of the Vaseline after the first coat of paint. So, I began rubbing the areas with a rag. This was a dumb idea because I still had to paint a second coat.

The paint will not adhere to the Vaseline, and it basically makes a crackly looking paste in the areas where the Vaseline was applied. If you have to paint two coats, do not remove the Vaseline until finished with both coats. That was my biggest mistake. The technique worked well enough, but I had to reapply Vaseline so I could do my second coat.

Personally, I think I would rather just take my sander to the project afterward, but it’s good to try new things. Plus that’s mostly because of my own impatience.

After I finished the painting, I topped it with Annie Sloan clear wax to give it a protective finish. The wax is technically used for chalk paint, and I previously had only ever used it on chalk paint, but because flat paint is pretty porous, I figured I’d give it a try, and it worked pretty well!

I just love this cute little dresser, and it matches my light and bright farmhouse style perfectly! But alas, I won’t be keeping this one. She will be heading with me to my spring shows (which I will be keeping you posted about more soon, but the first one will be the Vintage Market Days in Glen Rose Texas in March. So that’s good news for you, because this cutie could be yours!

So, have you ever tried using Vaseline to distress painted furniture? I’d love to hear about your experience! Don’t forget you can find me on Instagram and Facebook for more behind the scenes fun of my day to day life! Well friends, that’s all for today. Have a fabulous day!

DIY Projects

Antique Window Project

Hi you guys! I’m so glad you stopped by today! This week is flying by, and it’s hard to believe that Easter is just a few days away! Despite the weird highs and lows that we’ve seen in the tempurature the last few weeks, I’m so glad that spring is officially here!

I wanted to share with you guys a fun project I completed this week, which I think is in perfect timing for the upcoming Easter holiday. A few weeks back, I was roaming around my favorite flea market (why does it seem like half of my posts start with that sentence?), and I found  this super old, really pretty hymnal. It was way older than me, but it was still super nostalgic, because I grew up singing hymns from a hymnal. I grabbed it for five dollars, and I immediately had this project in mind.

I went through the book and found some familiar songs and cut those pages out. I know you may say that by doing that, I’m not respecting the integrity of the hymnal, but I think that I will enjoy what I’ve done with it far more than anyone else was going to use the hymnal for. If that even makes sense. I carefully sliced the pages I wanted with an X-Acto knife to be sure I had a clean cut.

Then I used scotch tape (very teeny tiny pieces) to tape the pages I had cut out onto the panes of an antique window I had. The window was something I already had, it was hanging on the wall previously with nothing on it. So here’s what I came up with: HymnalWindow5

Each hymn is a title that I’m familiar with, and each one is a sweet reminder of His love and all that He has done thoughout our lives. If you look super closely, you can see the tape, but I didn’t want to use another method that would either damage the pages or make it so that I was unable to recreate something using these materials.

I placed it above our bed, and I absolutely adore it.

HymnalWindow4

HymnalWindow1

HymnalWindow3

I really think it just adds a thoughtful touch to the decor in here. Really, what’s the point in putting together a home if it isn not meaningful? I’m already thinking of other projects I can do with the rest of the hymnal pages, seeing as how I’ve barely used a few.

There are Chrsitmas carols and classic American choruses, so the seasonal possibilities with this little hymnal are pretty endless. Plus, there’s just something about the yellowed pages of sheet music that is just beautiful. I seriously can’t get enough.  Can you tell I’m excited about this one?

What do you think of this project? It’s such an easy thing, I don’t know if it can actually be considered a a project! I hope you enjoyed this little project, and that it insires you to do something meaningful with the decor in your own home! That’s all for today, friends. Have a fabulous day!

DIY Projects

Vintage Window Styling

Hello there! Thanks for stopping by and taking the time out of your day to read my very first blog post! The purpose of this blog is to document my journey of making our hideous  challenging rental place a home. I figured there’s no better way to start off than just diving right in!


It's been a fun day hitting up all the local antique stores. This aqua window frame is coming home with me! Can't wait to figure out what to do with it!

A few weeks back, I found a cute vintage window frame at an antique store.  I had just the spot in mind at the house, so it came home with me.

I love the color it was when I bought it, but it just wasn’t going to work with the colors I already have going on in my house, so it had to go. I sanded it all down, leaving it looking like this:

IMG_1065


I knew I was going to want it to look a little unfinished, so I didn’t worry about sanding too professionally. (But let’s be honest, I probably couldn’t sand like a professional even if I tried.) In this picture you can see my little indoor workspace trick: I use old wrapping paper as a dropcloth. Super easy, and super disposable. Anyway, I then painted the whole thing white, not worrying about looking too uniform. When it was dry, I lightly sanded the edges to give it a bit of a distressed look.

IMG_1083

I knew it needed a home above the bed in our guestroom.

WindowFrame1

Here’s a closeup of the frame. I used some ribbon I had from a previous project to hang these cute miniature wreaths from the top. I got three of those wreaths at a thrift store for a dollar, by the way.

WindowFrame3

I really love the way this little project turned out. It was quick and easy! Now if only I could figure out what to do about the headboard situation in this room. Another project for another day, I guess.

That’s it for today. Have a fabulous day, friends!