House Progress

Exterior Color Inspiration and Ideas

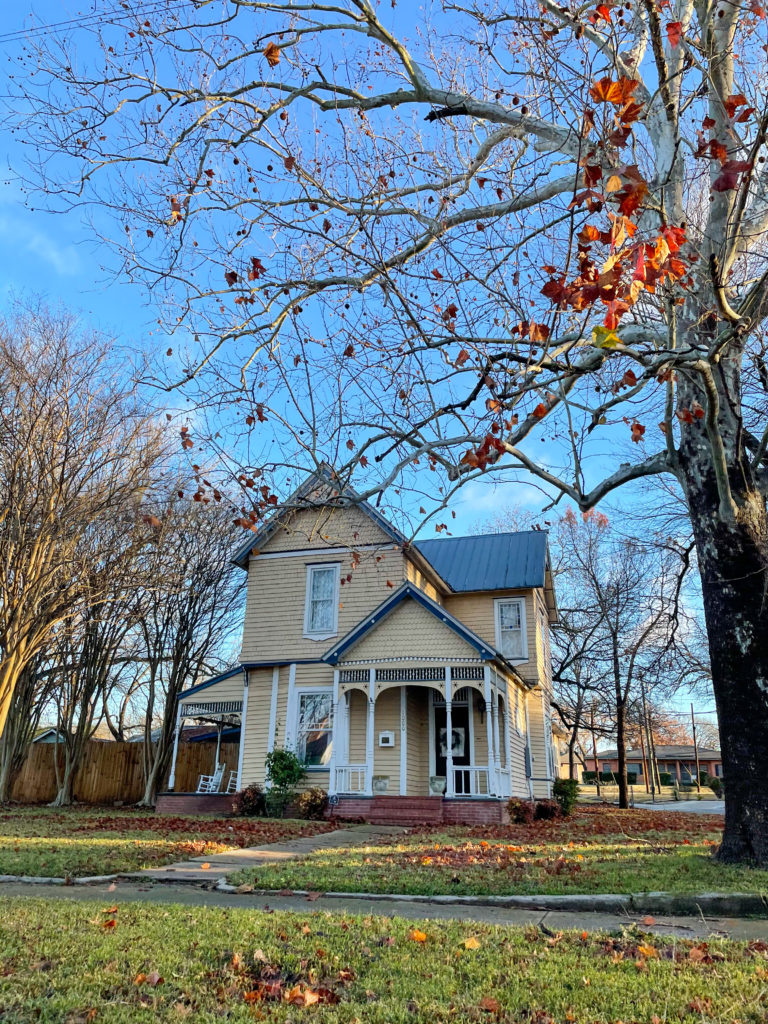
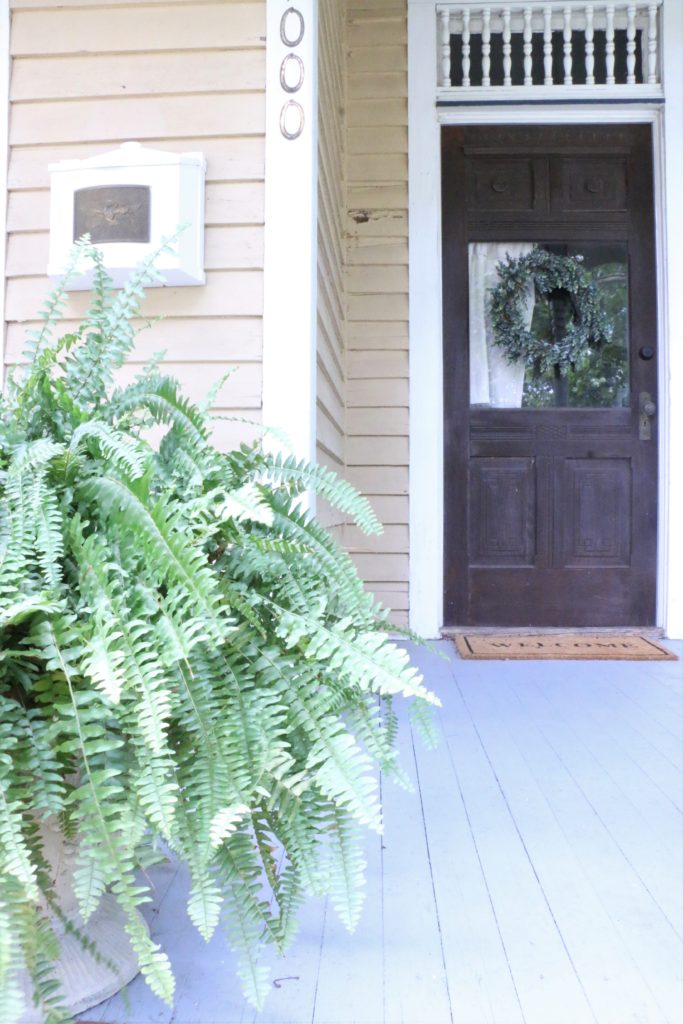
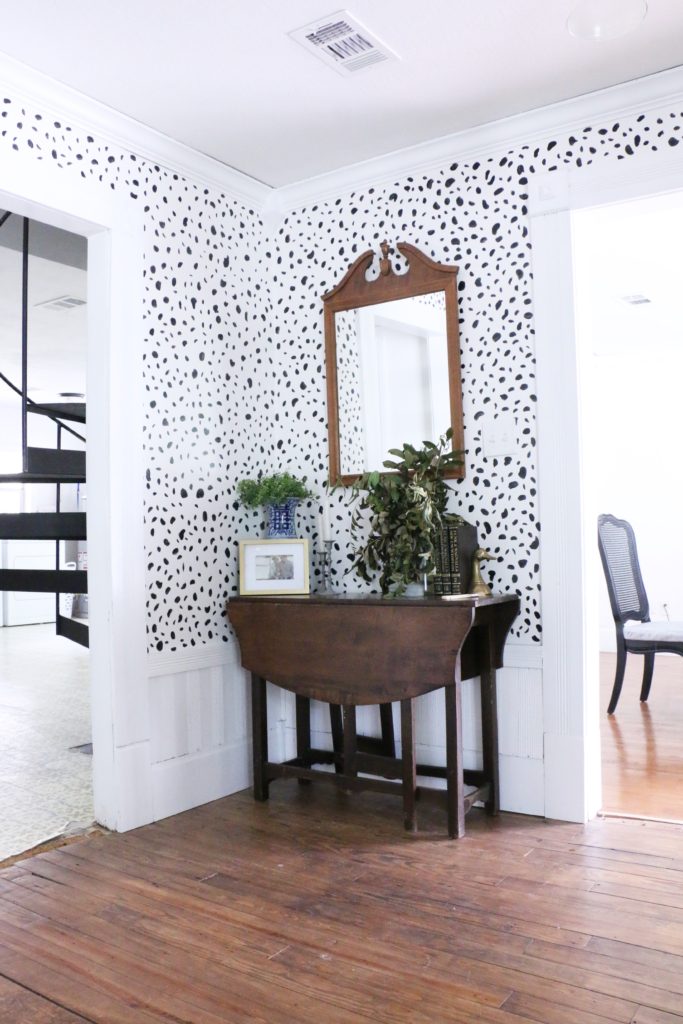
You guys have seen the outside of our house by now. When I share a photo of our exterior on Instagram, it’s always a favorite. When we bought the house, we knew we would be painting it eventually. We still aren’t ready to paint (we have a couple other things on the list ahead of painting), but I’m having fun thinking of ideas and looking for inspiration! I have four different directions I’m thinking of, and I wanted to walk you through each idea. There are some pros and cons to each one, so I wanted to get them all out in one place, if nothing more than for me to reference later on.

Classic White

source

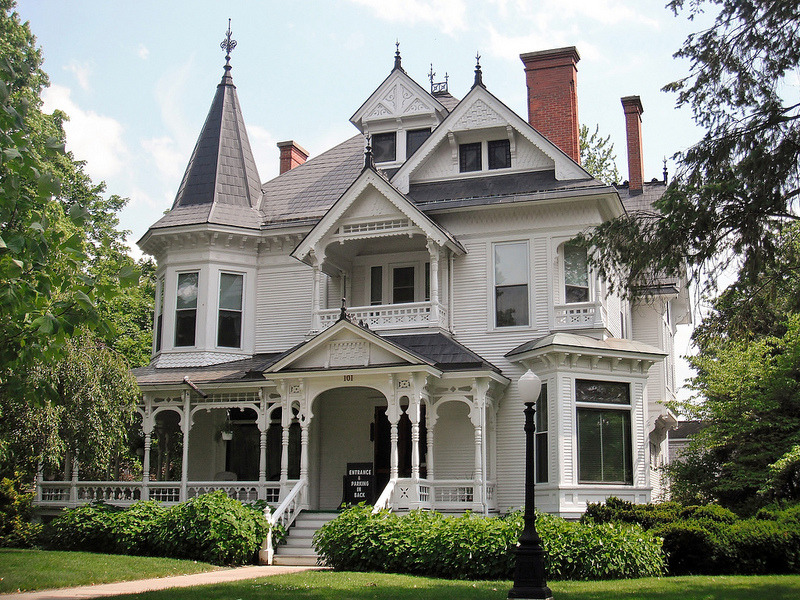
My love for white houses runs deep. It’s the most classic, most timeless in my opinion. Had we painted the house immediately upon purchasing, I would have painted the house white with black trim immediately without question. Now that I’ve had time to think through our options, I have the opinion that white with black trim can look a bit harsh, so I’d probably stick with white on white. The downsides are the frequent powerwashing needed to keep it looking fresh, as well as the fact that several houses in our neighborhood have recently been painted white. I don’t want it to be just another white house. In some sections of the exterior where we can see previous layers of paint, white is the oldest layer. That’s not to say that white was the original color, but it was white sometime a long time ago, so that’s something to consider.

Cream with White Trim

source

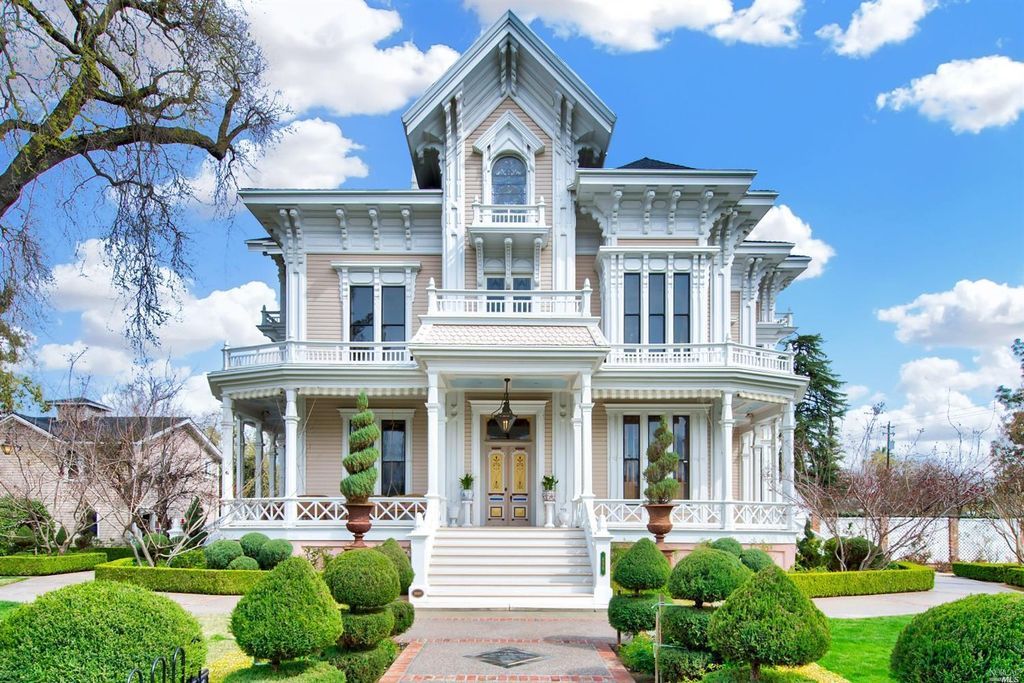
This kind of goes along with the light and bright vibe, but I feel that it would hide dirt better. This color option is born of sheer practicality. I would do a white trim with it, so there would be some contrast, but overall, it would be a light colored look. I can’t think of a ton of other houses near us that have this scheme going on either, so that’s a plus.

Blue with White Trim

source

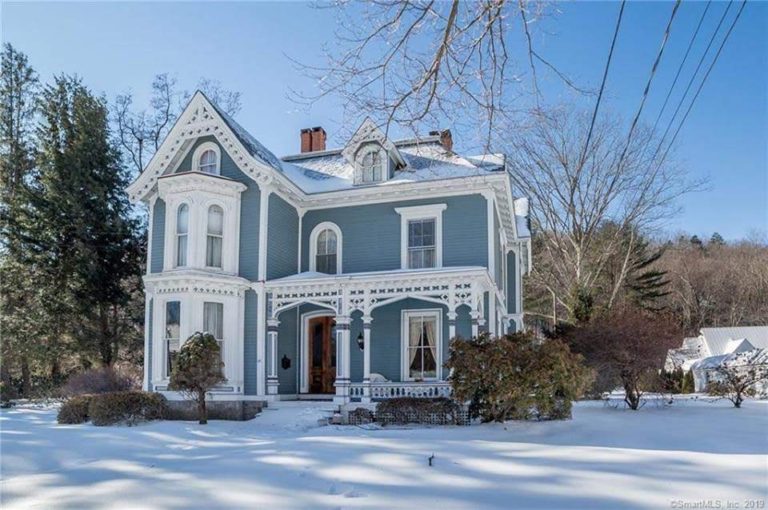
Okay, so this one can look really classic as well. I think we would go with a fairly dark, greyish blue, so all of our detail trimwork would really pop in white. And, when looking at a cross section of paint layers on some of our siding, there’s proof that the house was blue at one time (after it was white)! I can’t think of any other houses in town that have this scheme, it would hide dirt really well, and blue is my favorite color! The downside is that a lot of our interiors lean blue, so I’m worried that it might be too much blue? Is there such a thing? I’m not really sure, but it something to think about.

Black on Black Monochrome

source

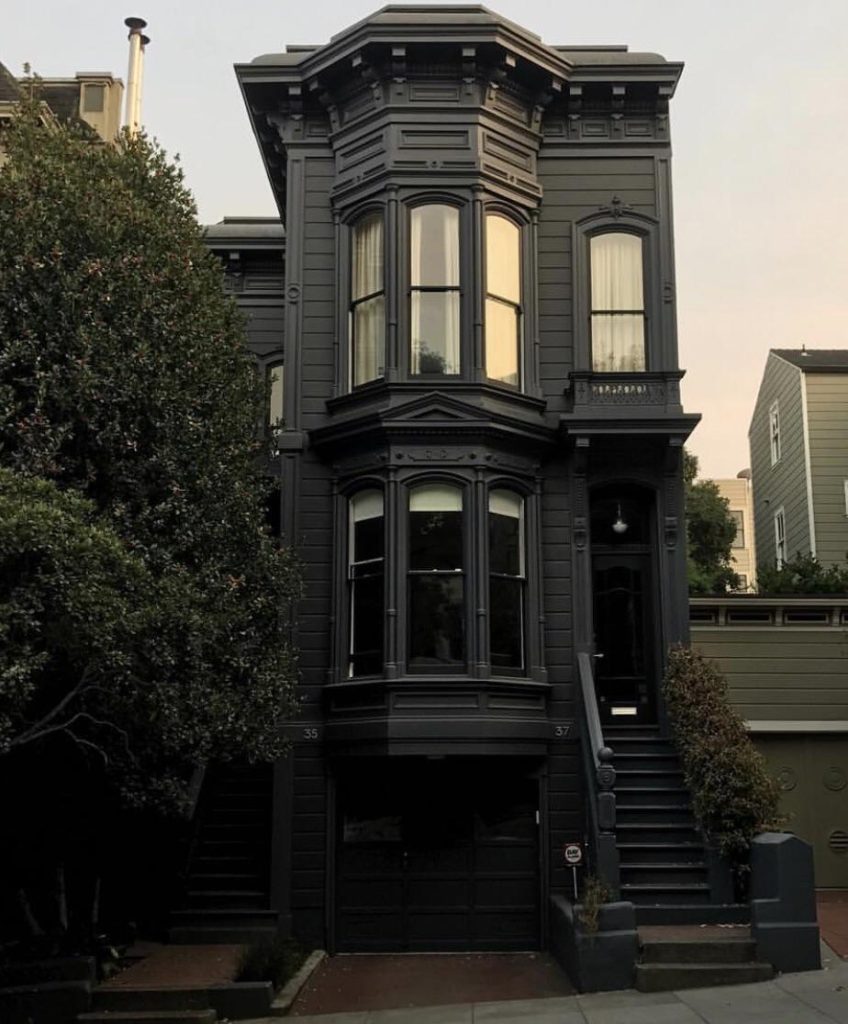
Okay, so this is the most bold and dramatic of my ideas. Black is definitely having a moment, and I really like the possibility of being the only house in town painted this way. It’s a bold choice for sure, and it would certainly be a talking point around town (some people would love it, others would hate it, and that’d be okay with me). My concern with this would be heat/energy. We do live in Texas, and summers are long and hot. I don’t know if having a black house would make it hotter inside in the summer? Also, would the color fade quickly? We would probably go with a deep deep grey, but it would be close enough to make it look black. Another concern is that this option is too trendy? The house’s current paint job is about a decade older than I am, so it’s something that will be with the house for a while. I don’t want to be tired of it in five years, you know?

In a way, I’m glad we haven’t painted yet, because it’s given me some time to think on the decision. But the more time that passes, the more options I think of, so I’m further away from making a decision. I want to do something that suits the house, and the neighborhood. Sure, we technically own this house right now (and plan to for a very long time), but this house belongs to everyone who has ever lived here, to everyone who uses our sidewalks to walk their dogs, to everyone who uses our house as a marker for where to turn to make the shortcut to the next signal, to everyone past and future who enter the front door, or just admire from the street. It’s a big decision, and I want it to be the right one. Unfortunately I just don’t know what that is yet. What do you think?

That’s all for today, have a fabulous day!

Organization

Organizing Baby Clothes (and a free download!)

Do you know what I was most unprepared for with having my first child? It wasn’t a lack of “stuff,” or even a certain thing my kid did that I couldn’t handle. Nope, it was the alarming rate at which babies grow out of clothes and then having no where to put those clothes. I’m going to show you my secret shame today, in hopes that it might make you feel better. At least that’s the hope!

I had absolutely no game plan for clothing storage with my first. And now, almost two years later, this is what his closet looks like:

None of those boxes have diapers in them. Every time he would outgrow a size, I would just throw all the clothes into a diaper box and stash it in the closet. Now that he’s going on two, there are a lot of boxes! It’s rather unsightly, and now that I have another child’s clothes to deal with, I am realizing I need to get a handle on this. Like, immediately!

So, I’ve come up with a plan to take care of this situation. And I’m going to get to it! Nope, I haven’t done it yet, but I did create some labels for new storage bins, and that’s half the battle, right? Right? Just agree with me.

I haven’t even started yet (I’m waiting on my new storage boxes to arrive), but these labels are getting me excited about this pesky little project. I’m going to just print them and laminate them before attaching them to my storage bins. Easy! If you want to snag some of your own, click here to download. I made a set for boys and girls!

I’ll keep you updated once I get moving with this project. In the meantime, happy organizing! That’s all for today, friends! Have a fabulous day!

DIY Projects

DIY Abstract Art

Last week I shared a post with several ideas for free and low cost art (you can read that here). This week, I’ve been super bored around the house with no big projects that I’ve been working on, and so I was itching to do something. I had been inspired by some abstract paintings I’d seen online, and figured I could make something similar with items I had in my garage. File this under: free projects. (If you don’t have a garage full of leftover renovation junk, this might not be free for you. But still super low cost! So, let’s get started!

The first thing I did was grab some plywood from the garage. Mine is smooth, but pressed wood would work as well. I used a board that was 24×36 inches, but any size will work! I also grabbed some drywall mud, a drywall mud pan, and a putty knife.

These photos are screenshots from a video I filmed at 8 pm while starting this project, so probably not the best quality. But bear with me. I started out scooping the drywall mud slowly onto the board, but quickly realized it would be easier to just pour a bunch on the board directly and move it around with my (gloved) hands.

Then, using both a putty knife, and my hand, I just gobbed it all around until the whole board was covered, and there was textured look to the entire thing. The goal was to make it look like super textured. I let it dry overnight, and when I woke up the next morning, it looked like this:

Exactly what I was going for! Then, I poured white paint over the entire thing and brushed it over the mud texture.

This step isn’t technically necessary, but I wanted it to be a brighter white. I used Behr Ultra Pure White, which is just what the color is with no tint in the paint can. You could also choose to do a different color here completely, depending on what you wanted your background to be.

After the white was dry, I did the final step. Unfortunately, I didn’t get any pictures of this step, because I was being climbed on by my toddler and forgot to take any photos! However, this is the fun/easy part. I just took a small craft brush, some blue paint I had on hand (Glidden America’s Cup Navy) and painted on some loopy squiggly lines. I didn’t really have a plan, I just went for it. You could do this in any color with any shape/line.

Some of the paint ended up dripping down, which I actually love. The messier the better with this!

You can see in some areas I went a little thicker with the paint, and in others I let the texture show through.

Overall, excluding dry time, this project took probably 45 minutes of active work. And now I have a larger piece of “art” that I didn’t have to pay for. And I absolutely love the way it turned out! You know that blue is totally my color, and so I think it works perfectly in the dining room where I have lots of blue and white going on.

What do you think? Would you try this? Let me know if you do! Well, that’s all for today, friends. Have a fabulous day!

*This post may contain affiliate links.

House Progress

Status Update: Year Two

Today marks the official two year anniversary of owning this old house of ours. Today I wanted to look back at this past year, year two, and see all of the things we accomplished. I’m going to share a few (not all) of the big projects we’ve done in the last 365 days.

If you’ve never seen the before pictures of our house, you might want to start there, just for fun. This last year kind of unintentionally became the year of getting the upstairs more livable. One year ago, our master bedroom was downstairs and the only thing we had done upstairs was our son’s room. In the fall, we updated one of the bedrooms upstairs and moved the master up there.

Then, over my winter break from school, I decided to do a bit of work on our upstairs bathroom.

We also worked on finishing the third bedroom upstairs this year when we found out we were expecting our second child. The nursery is one of my favorite rooms in the house, and I cannot wait to get to use it very soon!

During Spring Break (are we sensing a pattern here? it seems like every time there was a break from school, I did a project!) I painted the porch floors on all three of our porches. That ended up being a lot of work over an extended period of time, but made a huge impact.

In a spur of the moment decision late last summer, I decided to paint some dalmatian spots on the wall between our living room and dining room. Best decision ever!

We’ve also done tons of work in the yard, and countless small projects around the house to help move the progress along. It’s crazy to see how far we’ve come. They say that people overestimate how much they can get done in a day, but underestimate how much they can get done in a year, and it’s so true! Last summer I could not have imagined the progress we have made. I can’t wait to see where we are by the end of year three! Hopefully some work in the downstairs areas… I’m getting real sick of looking at a few things downstairs. LOL! Well, that’s all for today, friends. Have a fabulous day!

Home Decor

Free and Low Cost Art

They say that to make a house feel more homey, it needs art. Well, I agree, but what I know about art is that it’s expensive. And if I go to a big box store and buy something off the shelf, chances are someone I know has the same one in their house. And that doesn’t make my house feel special or unique. Today I wanted to share with you a few ideas for finding art for free or inexpensively that are unique and make your home feel special!

First, let’s talk free. It’s my favorite word.

This is a view of the art ledge in our living room. Our living room is a work in progress. Let’s look beyond that. A couple of things I have here are some literal weeds that I cut from my yard and pressed under some magazines. I stuck them in some thrifted frames I had on hand, and boom. Done. I also have a framed scrap of wallpaper that we found while tearing out a wall in our house. It’s probably close to 100 years old. Now, you may not have 100 year old wallpaper you want to frame, but you might have something personally special to you like a handwritten recipe card from your grandmother, or a silk scarf that your mom used to wear. Frame it, and it’s personal and unique and free art!

You can also paint your own abstract art. I would consider myself “creative,” but not “artistic” if that makes sense. But anyone can paint some circles or blobs on a piece of paper and call it art, right? (Also, check out this sneak peek of my bathroom refresh! I’m waiting on a few things to be delivered before I share more, but it’s coming! And it’s green!)

And while you’re browsing your favorite magazine, be on the lookout for pages that appeal to you. You can always cut pictures from books and magazines and frame those too!

Now let’s move to the “low cost” category.

Not quite as good, but still pretty cheap, so listen up.

These large frames in our living room are prints of Sanborn Maps. These are map views of our neighborhood from the early 20th century that I had printed. They are available for free on the library of congress website, but I’m including them in the “low cost” category because I had to pay a few dollars to have them printed in large format at my local office supply store. You may not live in an old house and so these may not be relevant to you, but I wanted to share with you my favorite and new found obsession for amazing prints.

The Smithsonian has thousands of archived digital files available to download right on their website for free. Can you even believe that?! Through Smithsonian Open Access, you can browse tons of actual paintings and photographs that you can legally download at a great resolution. These are free to download, but I’m including them in the “low cost” category as well, because I print them as posters or large scale photographs at my local drugstore. This ballerina print in the nursery was one that I downloaded from their website.

And lastly, you know I’m going to tell you to thrift. This original mini oil painting was $4 including the frame. No one else has one, and it helps the room feel unique. Thrift stores, flea markets, and estate sales are filled with framed art for just a few dollars. Sure, you have to look beyond the 90’s prints of flying ducks or the “live, laugh, love” posters, but there are some real gems to be found.

You can fill your home with pieces that not everyone has on a budget! You can fill your walls with art and special things without spending a ton of money. That’s all for today, friends! Have a fabulous day!

House Progress, Room Tours

Baby Girl Nursery REVEAL

It’s finally finished! The room we’ve been working on for months is done and I can’t wait to share with you all the details. If you haven’t been following along, you may want to catch up with some of the older posts pertaining to the nursery. First, I shared the original moodboard, how I did the DIY wall stencil, how I stripped the painted doors in the room, and the updated list of what projects were still left as of a month ago. Now that all those things are crossed off my to-do list, I’m finally ready to share.

Before we have a look at the photos though, let’s take it wayyyyy back to early April when I was in the planning stages of the room. This was the moodboard I came up with, mostly based on a few things I already had found (art) and furniture I knew I would be reusing from our son’s room (crib and rocker).

Now the whole thing has come to life and I could not be more excited.

The artwork over the crib was purchased at a flea market before I even knew I was having a girl back in… February? March? I snagged it because it was only ten dollars and I knew if I had a girl it would be perfect for above a crib. Luckily I am actually having a girl, otherwise I would just have this painting with no place to put it. It came without a frame, so it took me a while to track down a frame that fit, but I did eventually. I bought some random ugly artwork just for the frame, threw away the print inside, and used Rub ‘n Buff in the color Gold Leaf on the frame to make it look a little more aged. Here’s what it looked like before:

It’s so 2002 chic, am I right? Anyway, our crib is the same one I used in our son’s room, I just dyed the crib skirt with some RIT dye to change it up a bit.

The footstool, curtains, rug, and curtain rods were all new purchases for this room. The rocker was one we already had from our son’s nursery. You can see in these photos some shelves both with artwork and with books. Ethan built the book display shelves with a lip on the front to keep books from falling over. I stained them with my favorite stain color, Varathane Early American.

The pillow was something I whipped up in 30 minutes on a sewing machine on a whim after an unplanned Hobby Lobby trip. I used a pillow I already had and made a new cover for it with $3 worth of fabric. I used some leftover trim from another project.

The lamp was a Facebook Marketplace find, the table was a flea market find a few years ago, and the picnic basket was something I’ve had forever (it’s full of baby toys). The little doll quilt sticking out was made for me by my Great Grandmother when I was young.

Moving to the other side of the room, the dresser was Ethan’s when he was younger and I repainted it. The basket was a thrift store find, and the tassel on the doorknob was an estate sale find. The tree was found randomly on clearance one day just after I had started browsing Facebook Marketplace for faux trees. It was meant to be!

The artwork and decor on both shelves are a combination of thing I had and repainted, or things that were picked up at flea markets and estate sales. The actual art prints are from a source I recently discovered and am currently obsessed with. The Smithsonian Museum has something called Open Access which is an online catalog of millions of photographs, paintings, pictures of sculptures, etc. They’re all free and available to download without copyright infringement, so I like to search for different art prints and have them printed as posters. It’s a super affordable way to get high quality prints that aren’t just the same thing everyone has from the same box store!

The nursery is a such a happy room, and I absolutely love it! Although, it’s now time for it to be filled with the ugly but necessary baby accessories that aren’t pictured in these photos…

I love that just like the rest of our home, this room encompasses a little bit of old, a little bit of new, a whole lot of DIY, and a whooooooole lot of thrifted and secondhand finds. I wouldn’t have it any other way. Now we just need a baby sleeping in the crib!

And, just for fun, let’s throw this waaaaaay back to two years ago when we first bought the house (and let’s be honest, also a year ago because we did nothing in here for a long time).

Now that’s crazy, right? So, what do you think? Do you see what I saw with the original moodboard? I am so glad you stopped by to see our baby girl’s nursery! That’s all for today, friends. Have a fabulous day!

*This post may contain affiliate links.

Tutorials

How to Restore Old Doors that Have been Painted

Today’s post has been a long time coming. Because this project is not for the faint of heart. If you live in an old house, chances are, you have old doors. And, if you’re like me, many of those doors have been painted over time and time again. Now, maybe you’re luckier than me and a paintbrush has never touched your wood doors. But about half the doors in our house have been painted. With multiple layers of paint.

We plan on restoring all of them eventually, but hadn’t gotten around to any of it. But, since we’ve been working on the nursery, I figured the best doors to start with would be the two painted doors in there. Now, I’ve stripped a lot of furniture in the last several years, and restored a lot of tables and dressers, but I’d actually never done a door before. So consider this my totally non-professional guide on how to restore doors that have been painted.

Step One

Remove your door from the room that it’s in, and take it somewhere you’ll have room to work. Remove all the hinges and hardware.

Because I’m such a professional blogger I forgot to take a photo of the door while it was still in the room, but here it is outside of my garage before I got started. You can see in the corner of this photo the other door that I was already working one. I did this same process to both doors.

Step Two

If your house was built before 1978, you may have some lead paint. I use these tests to check for lead. Luckily for me, neither of the doors I was working on had lead paint, so that meant I could continue. If your paint tests positive for lead, you may want to consider your options. I would not recommend the following method. If there are multiple layers of paint, the most likely culprit will be the oldest paint, or the bottom layer, so be sure to check that.

Step Three

I found (after some trial and error with paint stripper) that the quickest way to go about removing paint quickly is to scrape it while it’s dry. I tried stripper, which worked, but it seemed to only take off a layer at a time. I found that this set worked well getting off lots of paint at once. The different shaped blades allow you to get into different cracks and crevices along the different surfaces of the door. I didn’t worry about getting 100% of the paint scraped off, but in general I got as much as I could.

Step Four

Sand. Sand like the world is ending. I used my orbital sander, and sanded first with a course 60 grit sandpaper to get the last of the paint off. On the edges of the panels where the orbit sander couldn’t reach, I sanded by hand. Once all the paint was off, I repeated the sanding with a 120 grit sandpaper and a 220 grit sandpaper.

Step Five

I used steel wool and mineral spirits to scrub the door one last time after all the scraping and sanding. Now, keep in mind, these steps took me like two weeks. I work in limited time shifts during naps and after toddler bedtime, so a normal schedule might allow this to get done in a matter of days, but I was averaging two weeks per door.

Step Six

This would be optional based on your wood and your preferences. I had one door in the room that was untouched, and I wanted the three doors I was working on to be all about the same color. So I used the stain we used on our floors throughout the house (Minwax Early American) and it ended up being a pretty close match to the door that was already in the room. I prefer to use a rag to apply (with rubber gloves on!), rather than brushing and wiping the excess. I just apply with the rag and rub it in immediately. If you like the color of your wood after you strip it all down though, you could totally skip this step.

Step Seven

The last thing I did was put a coat of Polyurethane on them. I like to buy the cheap paint brushes to apply the poly, and then just throw them out when I’m done. I ended up doing just one coat of poly (again, trying to match an existing finish!). I let the first side dry for 24 hours, then flipped the door around and did the other side. I let it sit for another 24 hours before moving them back into the room.

Step Eight

Bring your doors back into place, and re-install the hinges and doorknobs. And for goodness sake enjoy the fruit of your labor!

The door on the right is the entrance to the room, and the door on the left is one of the ones that were painted. There are a couple of white spots that you can see which are actually wood filler. They aren’t perfect…they’re 125 year old doors that had six coats of paint on them! But for goodness sake I think they turned out pretty good.

This door on the other side leads to the bathroom, and is the one from the first picture. Let me show you again:

Can you even believe that wood grain was hiding under all those layers of paint?!

This project was a doozy, I’m not gonna lie. It was weeks worth of work, sweating it out in my hot garage in a mask and protective gear. It wasn’t a fun DIY. But, they are back to the way they were intended to be in this house, and I think that’s what matters. And I’m stinking proud of the work that went into these. So, do you have any doors that need refinishing? Are you brave enough to take it on? (I totally think you can!) That’s all for today, friends! Have a fabulous day!

Organization

My Weekly Cleaning Schedule (and a Free Printable!)

I shared a couple of weeks ago over on my Instagram how I have silly names for all the chores I do each day of the week, and several people were interested in it, so I decided to share!

I have always been a pretty “clean and organized person,” but I never really stuck to any sort of routine, I would just do things as needed. But then I had a child and when I went back to work after maternity leave, I was feeling very overwhelmed about keeping up with my house and so I knew it was time to start a real routine. So even though it’s summer, and I’m technically home right now, don’t think that this isn’t for you if you are working outside of the home full time. This is about getting a little bit done each day so that you never have to do a lot at once.

First, there are a couple things I do every single day (or weekday). A load of clothes is one of them. I know that may seem counter-productive to some, but trust me on this. I never spend more than 5-10 minutes folding and putting away laundry. I start a load as soon as I’m dressed in the morning, flip it over, and fold it while I’m waiting for my son to fall asleep after I put him down for his nap. During the school year, I start it on my way to work, Ethan flips it on his way to work, and when I get home, I quickly fold and put away. Because it’s only one day’s worth of clothes, it’s never overwhelming. (Also, our washer has an auto sensing fill, so it’s not using excessive water. We haven’t noticed any difference in our water billing since I used to only do clothes once a week or so.)

I also vacuum every day. I realize most people don’t need this, I just have a hairy dog and a crumb monster child, so it works for me. If you don’t need a daily vacuum, just consider that a quick kitchen floor sweep. I usually do this in the evenings after my son goes to bed.

The last thing I do every day is dishes. We actually don’t have a dishwasher (pre-renovated kitchen problems), so I wash by hand at the end of the day, let them dry on the counter overnight, and put them away first thing in the morning. I know this sounds like a lot. I promise it’s not.

Then each day of the week, I do one chore or task that needs to be done on a regular basis but not every day. I came up with names because I’m nerdy like that, but it helps me remember! On Mondays I mop, hence Mop Monday. I mop all the hard surface floors in my house. on Toilet Tuesday I clean my bathrooms (we have two). On Wash Wednesday in addition to my load of clothes, I also run a separate load of sheets, and one of towels. On Third Thursday, I rotate through different things that don’t need to get done every week, but should still be getting done somewhat regularly. One week I’ll dust my flat surfaces and shelves, the next week I’ll do windows (again, dog and toddler), and the week after that I’ll do my kitchen. I’ll throw away anything in the pantry or fridge that needs to go, as well as clean the outside of my appliances. On Free Friday I just catch up on anything that I may have missed through the week. Inevitably there will be something that didn’t get done, so I give myself a buffer. And on the weekends, I don’t do anything but the dishes and vacumming. I keep the weekend open for bigger projects around the house.

And that’s it! I spend about 30 minutes each day keeping up with my house, and it keeps me on track so I don’t wake up one day to a bathroom that hasn’t been cleaned in a month. I never have to worry about doing a huge cleaning day, or spending all my weekend working on housework. Although our house is in a perpetual state of disarray because of projects going on at any given time, the general cleanliness is usually up to par.

If you’re reading this in the days that it was first written, join me on Instagram, as I’ll be walking through each day on my stories. You can do it with me! You can either screenshot the photo above if you are wanting to save it on your phone, or if you’re a paper kind of person, you can click the link below to download and print your own copy. Check it off each day as you go! I can’t wait to get cleaning together!

Click here to download the printable cleaning schedule!

Well, that’s all for today, friends. Have a fabulous day!

House Progress

Nursery Status: What’s Done, and What’s Next?

My big project as of late has been the nursery. of course. The big accent wall was a huge undertaking, and will definitely be the focal point of the room. Since then, we’ve done a few things, but still have a lot to do.

We moved the crib and rocker (ours isn’t sold anymore!) from our son’s room into the new nursery. I used some fabric dye to dye the crib skirt that we already had on hand.

I also painted the dresser that was previously in our room and gave it some fresh knobs from Hobby Lobby. For the dresser, I used a satin finish paint from Home Depot in the color Gentle Sea. This was a quick, slap a coat of paint on kind of project, not the kind where I did a step by step tutorial. I didn’t use very much of the paint that I bought for the dresser, so I ended up painting the inside of the closet with the same paint. It’s a fun little pop of color, and it makes the tiny closet special.

So, I still have a lot to do in this space before it feels “ready.” I have a bunch of projects, things to buy, and a few things I want to make.

Things to Do:

  • Paint the window frames
  • Finish stripping the door to the closet and bathroom
  • Reinstall the closet and bathroom doors
  • Deep clean the windows and floors

Things to Buy:

This is the big one, as I feel like I need to collect a ton of little things to make the room put together. Some things are specifics I have in mind, others are things I’d like to find thrifting (hopefully I can do that soon!).

  • Curtains (I just placed an order for these, but the shipping is going to take a while. I’m not even sure they’ll work, so I may end up returning.)
  • Curtain rods
  • Footstool (I’m loving this one.)
  • Crib sheets I like basic white ones for easy washing.
  • Small art work (I don’t have anything in particular in mind just yet. I’d love to find something vintage.)
  • A frame for the over-the-crib painting. I bought the painting at a flea market sans-frame. I’m hoping to find the right gold frame in the right size for the right price. Not too much to ask for, right? (If you have a 36x24in frame without glass or matting, let me know. I’m scouring FB Marketplace daily.)
  • An accent pillow for the rocker. I put the one from my son’s room in here, I’m not sure if I love it.
  • A lamp (nothing specific in mind, not sure if I’ll go thrifted or new)
  • Tall plant?? (I need something with some height in one particular corner to disguise an awkward wall length. I like the look of olive trees, but we’ll see.)

Things to Make:

  • Shelves for book and art displays

There is still so much to do in here, and with stores being closed and shipping being delayed, it seems like I’ve been unable to get moving in here. Hopefully soon I can get things moving! I have been working feverishly on the door refinishing, and I will share a full tutorial of that process once it’s finished. That’s all for today, friends. Have a fabulous day!

This post may contain affiliate links.

House Progress

Backyard Updates

Backyards are a tricky thing, aren’t they? I don’t have a green thumb, I have a giant dog who ruins grass, and I have never particularly enjoyed being “outdoors.” But, part of being a homeowner and making improvements to your home includes the outdoors as well. My toddler loves to be outside. Now that the weather is nice, he would rather be outside playing with the hose and some trucks than doing anything inside. So, I’ve been spending more time than ever in the backyard lately.

After painting the porches, I had a lot of paint left over. I accidentally overbought. Which turned out to be a blessing in disguise because I had extra paint for projects on a whim. Since spending so much time in the backyard, I’ve been able to dream up more things I wanted to do with the space, and it’s been nice to have supplies on hand. We have this swing and arbor in the backyard that came with the house. It was pretty sad looking, and we thought about taking the swing down and making some kind of grilling station, but the more we sat in it, the more we thought it should stay. I was swinging one day when I realized I had extra white paint from the porch railings, I might as well just paint the thing.

So I did. I used my paint sprayer and sprayed the whole thing.

As for the pea gravel firepit to the right, you may remember my early stages of this from last summer. Well, we bought pea gravel last summer, but it wasn’t enough, so we just sat around with a half pea graveled firepit for a year. I told Ethan I wanted to finish off the firepit for Mother’s Day, so my Mother’s Day present was literally a truckload of pea gravel and a wheelbarrow. Some people get perfume, I got literal rocks.

But we sat out here on Mother’s Day and made s’mores for dinner and it was wonderful. It’s already a much used space. My son is also loving the fresh pea gravel for his shovels and dump trucks.

We (and by we, I totally mean I, with Ethan just along for the ride) also decided to build our son a playhouse. We used all scrapwood we had in the garage and leftover paint from the porches. We don’t have plans for this, but basically it went something like this: I looked at the piles of wood in the garage, drew a picture of what I thought could work, and Ethan built it two days later.

It is definitely a more family friendly backyard now, and we enjoy spending time out here so much now that things are fresher and nicer to look at. 🙂 Now we just have to do something about the dead grass…

My favorite thing about this yard is what it looked like just a year ago. Everything we’ve done in the last two months has been one project leading into another as far as supplies go, and I love the way one thing inspired another.

I wish I had photos of when we first bought the house two summers ago…there was no fence, there were awful metal garden bed edgers that were just full of weeds, there was a broken chimnea in the middle of the yard. It was in rough shape. I’ve heard it said that with outdoor spaces, you just do a little more each year, and soon enough you have a space you can really be proud of. I have so many more plans for next year already. I’m already focusing on learning more about gardening and have big, green plans. Maybe next year! Well, that’s all for today, friends. Have a fabulous day!